🔔 Note: this article is part of the CartonCloud Academy - WMS Basic Setup Trail. Please ensure you have read Introduction to Products Unit of Measure first. 🎓
What is a Warehouse Location in CartonCloud
Warehouse Locations in CartonCloud are designed to replicate the locations you have set up in your physical warehouse. You can then allocate stock to these locations in CartonCloud to reflect what is physically in the location in your warehouse. Stock will only be charged storage once it is allocated to a Warehouse Location.
How to name your Warehouse Locations in CartonCloud
You have complete control over how you name your Warehouse Locations in CartonCloud. You could use free text and choose to call a location ‘Bulk Location’ or ‘Receiving Bay’, or you can use the recommended naming conventions and have the location names automatically populate. The great thing is that you can use both options and have some locations using the recommended naming conventions and some locations with free text names! Let’s quickly run through how the recommended naming conventions work.
Nick from Coffee Warehousing and Distribution has a map of his warehouse; we will use that to explain how the naming conventions work. CartonCloud breaks down the locations by row, bay and level. As you can see on the birds-eye view map of Nick’s warehouse, he has rows and bays.
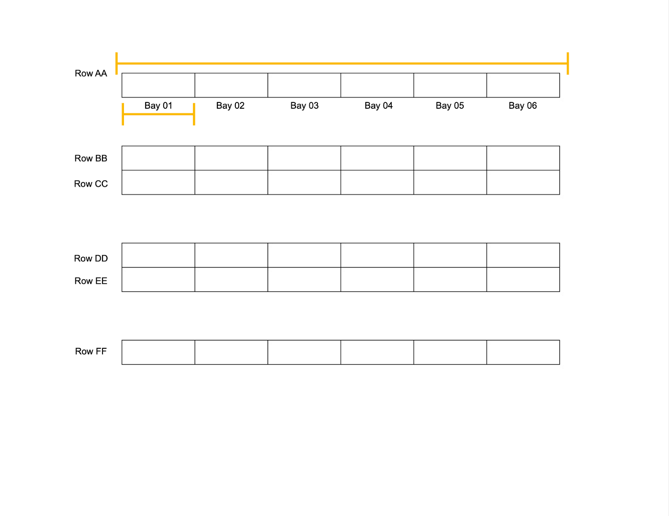
Nick has row AA through to row FF. In each row, he has bay 01 to bay 06. If we looked at a warehouse location side on, we would see the different levels the locations have.
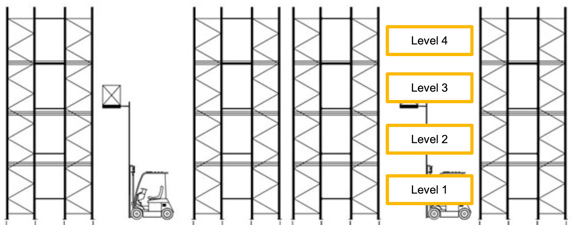
CartonCloud will join the row, bay and level to create a Warehouse Location name. For example, the warehouse location in row AA, bay 01 on level 3 would look like AA-01-03.
This naming convention is simple and allows you to create warehouse locations in bulk more easily. We will cover more on this in the following unit!
How to add a single Warehouse Location
There are many different ways you can add Warehouse Locations in CartonCloud. You can add them in bulk via import/export or create them individually. We are going to start by adding a single Warehouse Location.
Follow along with Vincent as he steps through how to create a single warehouse location.
After looking at his warehouse map, Nick thinks he has a pretty good idea of what Warehouse Locations he needs to create. However, he will first add a single warehouse location to ensure he understands how Warehouse Locations are created.
If you are following along in your account, we suggest making sure you know exactly what Warehouse Locations you need to create for your warehouse, as you can not delete Warehouse Locations.
Adding Warehouse Locations in Bulk
Now that you understand how to create a warehouse location manually, we can look at adding Warehouse Locations in bulk. This is a great way to add your Warehouse Locations if you are following the naming system we covered in the first unit.
Follow along with Vincent as he steps through how to add Warehouse Locations in bulk in your CartonCloud account.
Nick from Coffee Warehousing and Distribution will use the suggested naming convention for his Warehouse Locations. So adding Warehouse Locations in bulk will work well for Nick. Using Nick’s warehouse map, he will start by adding row AA.
It is important to know what row you will be adding in bulk and the number of bays and levels in the row before you add your Warehouse Locations in bulk.
Creating Warehouse Locations via import/export
Another way you can create Warehouse Locations is via import/export. This process includes exporting your Warehouse Locations in an XLS format, updating them or adding new ones to the file and then importing them back into CartonCloud to create new locations or update existing ones. This allows you to create multiple Warehouse Locations simultaneously, across multiple rows, regardless of whether you use the suggested naming convention. If you are not using the CartonCloud naming convention, then it is suggested that you use this method to create your Warehouse Locations.
Follow along with Vincent as he shows you how to create new Warehouse Locations via the import/export function.
Nick has created one row of his Warehouse Locations, AA, using the Add Warehouse Locations in Bulk process. However, he already has a list of his locations in an excel file, so he will use that data to create his new Warehouse Locations.
If the import is unsuccessful due to an issue such as formatting, an error banner will be displayed, and the error will be described.
If you receive an error, you can find out why it occurred by following the same actions as the animation below.
What are Warehouse Location barcodes?
For every Warehouse Location in CartonCloud, you can set up a barcode for that location. With a barcode set up for the location and printed on a location label, you can scan the barcode for actions such as moving, picking and putaway (on the mobile app). This helps to make your picking and putaway process as efficient and accurate as possible! It also allows you to maximise the benefits of the CartonCloud mobile app and the Scan Move feature.
Nick from Coffee Warehousing and Distribution plans for his team to use the CartonCloud mobile app for both the inbound and outbound process. Nick doesn’t have any existing Warehouse Location labels, so he will need to start from scratch and create them with CartonCloud. However, if Nick already had labels and barcodes set up, he could simply add the existing barcodes to the warehouse locations in CartonCloud.
Creating Warehouse Location barcodes
Nick can’t remember if he created barcodes during the Warehouse Location creation process. So, he is going to check if he has barcodes set up by exporting his Warehouse Locations.
- Navigate to the Warehouse Locations page, Warehouse>Warehouse Locations.
- Select More>Export to XLS.
- Open the file.
Nick notices that the barcode column is blank; he will need to load barcodes against the Warehouse Locations.
- In the name column, select the cell in the first row of warehouse locations. Hold down CTRL + SHIFT + down arrow. This will highlight the whole column down from the first cell you selected.
- Copy the data.
- Paste the data in the barcode column.
- Save the file.
- Navigate back to the Warehouse Locations page. Select More>Import XLS.
- Select the file and click Upload File.
- Once the file has been imported, the Updated tab will show the changes made to the Warehouse Locations. Select Confirm Import.
Already have Warehouse Location barcodes in your warehouse?
If you already have warehouse location barcodes in your warehouse, you can follow the same process as above; however, instead of copying the name column, simply copy your existing barcodes into the barcode column.
Printing Warehouse Location labels
Now that your barcodes are set up, it is time to print your Warehouse Location labels. The label will include the barcode to enable barcode scanning during the putaway and picking process.
CartonCloud’s Warehouse Location labels print on A4 pages. This is great because it allows you to easily load your printer with PPS label paper to print your labels in bulk.
You can follow the instructions here on how to print your labels from within CartonCloud. However, if you have a large number of Warehouse Locations to print, we suggest following this process using the Avery templates.
Nick has printed his labels and has his team placing them on the warehouse locations in the warehouse so they are ready for when they start using CartonCloud!
▶️ Follow along in the WMS Basic Set Up Trail...next up is Products Explained 🎓