🔔 Note: this article is part of the CartonCloud Academy - TMS Basic Setup Trail. Please ensure you have read Get Started with Transport Lanes first. 🎓
In the previous units, we covered the components that enable CartonCloud to allocate Consignments automatically to a Delivery Run, creating a seamless and efficient allocation process for your operation.
Another way in which CartonCloud helps to optimise your processes and limit the number of manual tasks you and your team have to complete is by automatically calculating Consignment charges. CartonCloud uses Income Zone Sets, Rate Cards and Transport Rates to calculate Consignment charges automatically.
The below diagram helps to explain how this process works in CartonCloud.
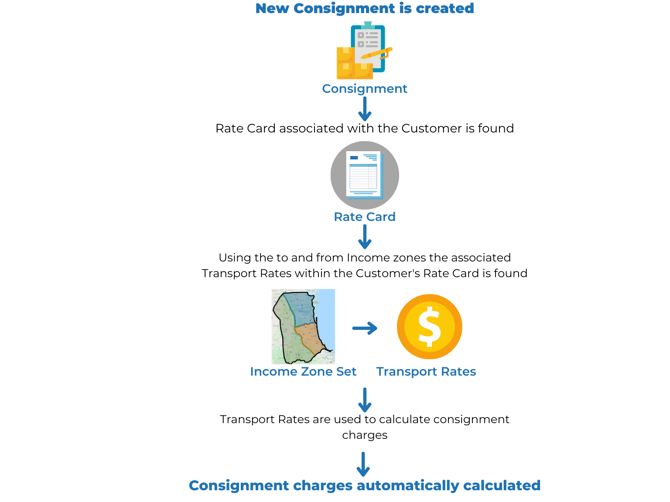
Rate Cards and Transport Rates will be covered in the TMS Charging Trail; therefore, in this unit, we will just focus on the role that Income Zone Sets play in the process.
What are Income Zone Sets?
Income Zone Sets are similar to Transport Zone Sets; however, Income Zone Sets are the zones your operation uses for charging, whilst Transport Zones are the zones your operation uses for allocating Consignments.
Income Zones will be used when you create your Transport Rates and allow CartonCloud to calculate Consignment Charges automatically. Nick from Coffee Warehousing and Distribution is looking forward to setting up his Income Zones as it means he will no longer need to manually calculate Consignment charges, and the risk of revenue leakage will be significantly reduced.
Each Zone Set is made up of multiple zones, and each individual zone is made of single or multiple suburbs and postcodes. When creating zones, you can associate as many or as few suburbs and postcodes with one zone. This means you can create a zone for a state, city, area within a city, or even a specific suburb.
Application of Income Zone Sets
For Coffee Warehousing and Distribution, they will need to create an Income Zone for each zone they use to base their rates off. For now, we will just focus on the Gold Coast area, but Nick will need to follow this process for all the areas the company deliver to. The map below shows how Coffee Warehousing and Distribution has divided the Gold Coast into different zones for its delivery allocation (Transport Zone Set) and rate calculation (Income Zone Set).

Suppose Coffee Warehousing and Distribution have a consignment moving from Burleigh Heads to Paradise Point. In that case, CartonCloud will find the Income and Transport Zone associated with the suburbs of Burleigh Heads and Paradise Point.

CartonCloud will then use the Income Zone pairing to find the associated Transport Rates and the Transport Zone pairing to find the matching Delivery Run.
Consignment 1:
- From address: CartonCloud, 5/27 Dover Drive, Burleigh Heads 4220
- To address: FoodWorks Paradise Point, Shop 1/3 Grice Avenue, Paradise Point 4216
- Income Zones: Area 2 → Area 1
- Transport Zones: GC Metro → GC North
- Delivery Run: Metro Daily
Create an Income Zone Set
Now that you know what an Income Zone Set is, it is time to create one in your account.
Unlike Transport Zone Sets, where you can only have one Zone Set, you can have multiple Income Zone Sets. This is useful if you use different rating zones for different customers.
Coffee Warehousing and Distribution use two different charging zones in the Gold Coast area as they charge customers differently. In this case, Nick will need to create two different Income Zone Sets and associate the appropriate Zone Set to the correct Rate Card that the customer uses. For example, Coffee Warehousing and Distribution have two consignments for two different customers (Country Roasters and Coastal Coffee), both moving from the same address in Robina to the same address in Helensvale. Country Roaster’s Rate Card is associated with the Standard Income Zone Set, and Coastal Coffee’s Rate Card is associated with the Radius Income Zone Set (which is based on the distance from their depot).
Country Roaster’s consignment will travel from Area 2 to Area 1, whereas Coastal Coffee’s consignment will travel from Zone 1 to Zone 3. Therefore, even though both consignments have the same to and from address, the rates can be configured differently in accordance with the different Income Zone Sets.

Follow along with Vincent as he further explains an Income Zone Set and how to set one up in your account.
Need to create multiple zones?
If you know what Incomes Zones you need to create, then we suggest creating your Zones in bulk using the export/import function. To do this, please see this page in our Knowledge Base (see the heading Creating zones in bulk - using the export/import function).
Add and assign location entries
You have now created your Income Zones; however, CartonCloud still doesn’t know what Consignments need to be rated against each of these Zones. As of right now, these Zones have only been named; we haven’t defined the area associated with the zone (the postcode and suburb). This unit will cover how to define your zones by creating location entries.
What is a location entry?
A location entry is a suburb and postcode combination associated with the relevant zone and used to find a match against addresses on Consignments. For example, even though we have created a zone called ‘Area 1’, CartonCloud still doesn’t know what Consignments need to be rated against ‘Area 1’. This is why you create location entries and associate the entry with the zone so that CartonCloud can associate the delivery address on the Consignment to the correct zone. So, for example, if you have a location entry for Burleigh within the Area 1 Income Zone, CartonCloud will now know that for any Consignments with a delivery address to Burleigh, they will be using the rates associated with the Area 1 Zone.
Time to create a location entry!
To create your location entries, follow the instructions here. If you would like to create more than one location entry at a time, follow the instructions below.
To save time, you should create location entries using the export/import function. This is especially useful when you already have the locations stored in a spreadsheet format.
▶️ Follow along in the TMS Basic Set Up Trail...next up is Transport Products in CartonCloud 🎓