Table of Contents
- Purpose
- Benefits
- Transport products video overview
- How to create a transport product
- Transport product status (active and inactive)
- How to charge for a transport product (consignment item)
- Transport products list view
- Export/import transport products
- Setting up Transport Products with barcodes for the Pack Screen
- How Transport Product weights interact with the system
- Carrier Predefined Package
Purpose
Transport Products allow you to set preconfigured descriptions and codes for a Consignment Item. You can also optionally add the predefined length, width and height.
Benefits
Once a Transport Product is created, you are then able to two do things:
- Book Consignments much faster by using Transport Products within Consignment items to reduce repetitive data entry
- Define Rates in your Rate Cards based on specific Transport Products. For example, sending a tyre from Brisbane to Sydney or sending a Solar Panel from Melbourne to Adelaide.
Transport Products Video Overview
How to create a Transport Product
-
Navigate to the Transport Products page, Transport> Transport Products.
-
Select the green +Add Product in the top left corner

-
Complete the required fields.
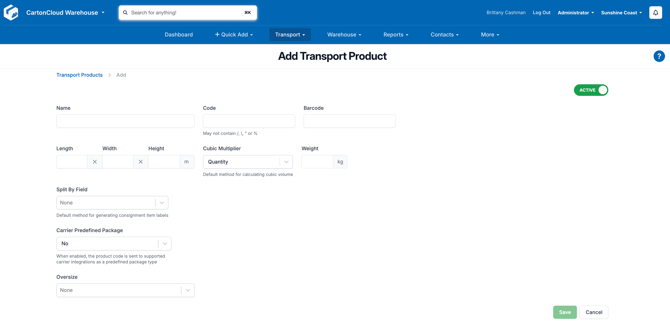
- Select the Save button.
The unit of measure the dimensions are displayed in can be configured in the Organisation Settings. For more information please see Changing the unit of measure in your tenancy.
Transport Product Status (Active and Inactive)
When creating a Transport Product, you can choose the status of either Active or Inactive.
If a Transport Product is Inactive, it will not be listed as an option in the Consignment item code dropdown on the Consignment.
If a Parser is imported with an inactive Transport Product, the order will be rejected, and the error message will advise that the item code is not valid. If a Sale Order Unit of Measure is mapped to a Transport product, then the Transport Product will not be able to be set to Inactive.
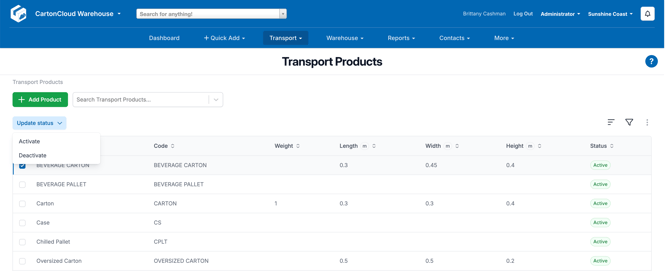
To change the status of a Transport Product from the list page view:
-
Use the check box on the side of the product.
-
Select the blue Update Status button.
-
Select Deactivate.
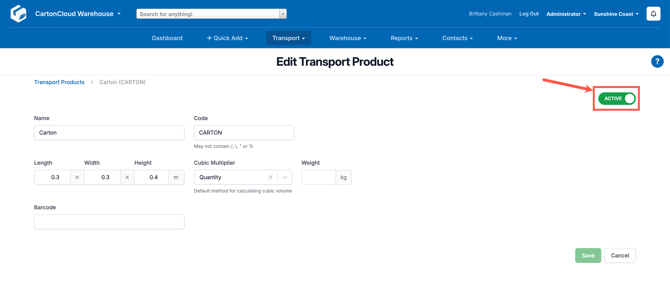
To change the status of a Transport Product from the edit Transport Product view:
-
Select the Transport Product you wish to edit.
-
Slide the Active/Inactive toggle.
-
Select Save.
How to charge for a Transport Product (Consignment Item)
Transport Products can create set rates within your Customers Rate Cards for moving a specific Transport Product from one Rate Zone to another.
How to set up charges for Transport Products is covered in the Setting up Transport Rates article of the setup guide, with further per page support available on the View Rate Card article.
Transport Products List View
You can sort and filter the list from the Transport Products list view and configure how the Transport Products appear in the view.
You can use the simple sort, advanced sort and advanced filter functionality to organise your Transport Products as you see fit.
See Advanced sorting and filtering for more information on how to use the filter and sort functionality. 
Export/Import Transport Products
To update and create Transport Products in bulk you can export and then import them into CartonCloud.
To do so:
-
Select the Transport Products you wish to export using the tick-box on the far left.
-
Select the three-dot circle in the top right corner.
-
Select Export.

- Edit the excel file and then save the file.
Note, if you are creating a new Transport Product, ensure you keep column A (the id column) empty.
-
Select the three-dot circle in the top right corner.
-
Select Import.
-
Select the file to upload.
-
Select Import.
-
You will then be notified of when the import is complete and be able to view your results.
Setting up Transport Products with barcodes for the Pack Screen
If you are using the Pack Screen you will need to ensure:
- The commonly used packaging (e.g boxes, satchels) is set up as Transport Products.
- A unique barcode is assigned to the Transport Products (add the barcode to the barcode field when creating or updating the Transport Product).
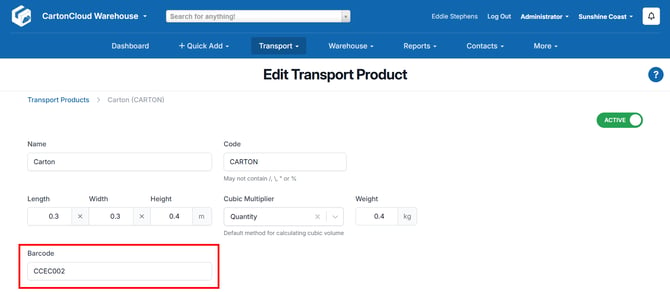
When you scan a Transport Product barcode in the Pack Screen, a new Consignment Item is created automatically. The Product Code, Description, and Dimensions are pre-filled, making the packing process faster and more accurate.
How Transport Product weights interact with the system
When a weight has been entered against a Transport Product, it will interact with Consignment Item weights in the following ways:
-
Pack Screen:
-
When the Transport Product is selected for an existing Consignment Item, the weight is added to the item's current weight.
-
Scanning a Transport Product barcode automatically creates a new Consignment Item, set to the Transport Product's weight.
-
-
Consignment Items Screen:
-
Selecting the Transport Product on the Consignment Items tab of a consignment will override and set the Consignment Item's weight to the Transport Product's weight.
-
-
Sale Order Consignment Creation:
-
When generating a Consignment from a Sale Order, if the associated Sale Order Product does not have a weight specified, the system will use the Transport Product's weight.
-
Carrier Predefined Package
For more information on Carrier Predefined Packages, please see Self-Managed EasyPost Carrier Connection