
Table of Contents
- What are Preferred Zones
- Prerequisites
- How to add Preferred Zones to a Product
- How to add Preferred Zones in bulk using Export and Import
- Preferred Zones rules and import errors
What are Preferred Zones
A Warehouse Zone is a label, for example Bulk, Cold Store or Pick Faces, that groups Warehouse Locations together. Zones are created on your Warehouse Locations.
Preferred Zones tell CartonCloud which Warehouse zones a Product prefers to be stored in. You set Preferred Zones for each Product, in each Warehouse the Product belongs to. When you put stock away using Directed Putaway, CartonCloud looks up the Product's Preferred Zones for the Warehouse you are working in and ranks the Warehouse Locations in those zones higher using the In Zone Location Selection Method.
You can add Preferred Zones in two ways:
- One Product at a time using the Preferred Zones tab on the Product page.
- Many Products at once using the Preferred Zones export and import file.
Use cases
- Store chilled Products in the Cold Store zone and bulk pallets in the Bulk zone.
- Direct fast-moving Products to zones close to dispatch to reduce pick travel.
- Keep the same Product organised consistently across several Warehouses, each with its own list of preferred zones.
Benefits
- Warehouse operators receive put-away suggestions that match where each Product belongs, which reduces misplaced stock.
- Zone preferences are managed per Product and per Warehouse, so multi-site operations stay consistent.
- Bulk import and export lets you set up hundreds of Products in one file.
Note: If a Product has no Preferred Zones for the current Warehouse, In Zone matches no Warehouse Locations for that Product. CartonCloud does not use the zone of the stock's current location instead. The other Location Selection Methods continue to work as normal.
Prerequisites
- You have the Administrator role. Only Administrators see the Preferred Zones tab and the import and export options.
- Your account has access to the Warehouse you are setting zones for.
- The zones already exist on Warehouse Locations in that Warehouse. Preferred Zones can only be chosen from zones that exist. To create zones, see Zones in the Related pages section.
- The Product belongs to the Warehouse. A Product belongs to the same Warehouses as its Customer.
- Your account is enabled for Directed Putaway to use the zones during put-away. To check the Directed Putaway requirements, see Directed Putaway in the Related pages section.
How to add Preferred Zones to a Product
Use the Preferred Zones tab to set zones for a single Product. Each Warehouse you have access to, and that the Product belongs to, has its own zone selector.
- Navigate to the Products page, Warehouse > Products.
- Search for the Product and click the Product name to open the View Product page.
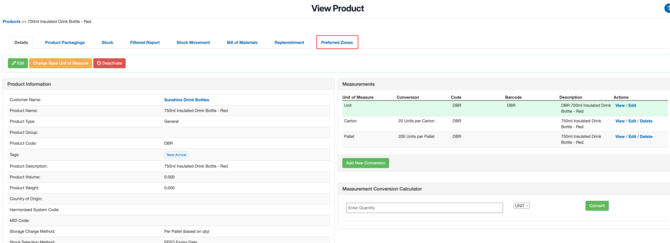
- Click the Preferred Zones tab.
- Find the Warehouse you want to set zones for.
- Click the zone selector for that Warehouse and select a zone from the drop-down list. The list shows the zones that exist on Warehouse Locations in that Warehouse.
- Repeat to add more zones. You can select up to 10 zones per Warehouse.
- Repeat for any other Warehouse listed on the tab.
- Click Save.
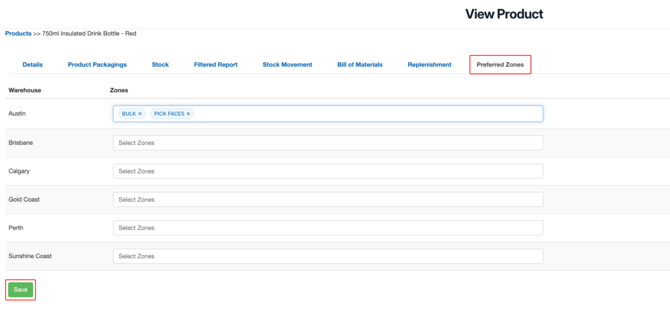
The Preferred Zones are saved against the Product for each Warehouse.
How to change or remove Preferred Zones on a Product
- Navigate to Warehouse > Products and open the Product.
- Click the Preferred Zones tab.
- To remove a zone, click the remove icon next to the zone name in the Warehouse's zone selector. To add a zone, select it from the drop-down list.
- To clear every Preferred Warehouse Zone for a Warehouse, remove all zones from that Warehouse's zone selector.
- Click Save.
Note: Saving the tab only changes the Warehouses shown on the tab. Preferred Zones for Warehouses you do not have access to stay unchanged.
How to add Preferred Zones in bulk using Export and Import
Use the Preferred Zones file to set zones for many Products at once. This file is separate from the Products export and import and works in the same way as the Replenishment Settings export and import. Each row is a Product and each Warehouse column holds that Product's Preferred Zones.
Step 1: Export the Preferred Zones file
- Select the Warehouse you want to work in from the Warehouse drop-down menu in the top right of the screen.
- Navigate to the Products page, Warehouse > Products.
- Apply any filters to limit the Products you want to export. Skip this to export all Products.
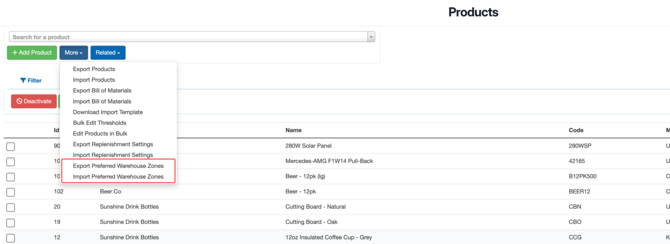
- Click More > Export Preferred Zones.
- Click the bell notification in the top right corner, then click Download Here to download the file.
Step 2: Update the file
Open the file in a spreadsheet application. Each row is a Product. The file contains the following columns:
|
Column |
Description |
|---|---|
|
ID |
The Product's CartonCloud ID. The import uses this to match the row to the Product. Do not change this column. |
|
Customer, Product Name, Product Code |
Shown for reference. The import does not update these columns. |
|
One column per Warehouse, for example Brisbane, Melbourne, Sydney |
The Preferred Zones for that Product in that Warehouse. The file has one column for each active Warehouse you have access to, headed by the Warehouse name. |
Update the Warehouse columns using the following rules:
- Separate multiple zones with a comma, for example Bulk, Cold Store.
- If a zone name contains a comma or a double quote, wrap the zone name in double quotes and type any double quote inside the name twice. For example, "Cold, Dry", Bulk imports as two zones: Cold, Dry and Bulk.
- Type each zone exactly as it appears on the Warehouse Location, including upper and lower case. Bulk and bulk are different zones.
- Spaces before and after each zone name are removed automatically.
- A cell with zones replaces the Product's existing Preferred Zones for that Warehouse.
- An empty cell clears the Product's Preferred Zones for that Warehouse.
- Leave the cell empty for any Warehouse the Product does not belong to.
- Delete a Warehouse column to leave that Warehouse unchanged.
- Enter a maximum of 10 zones per cell.
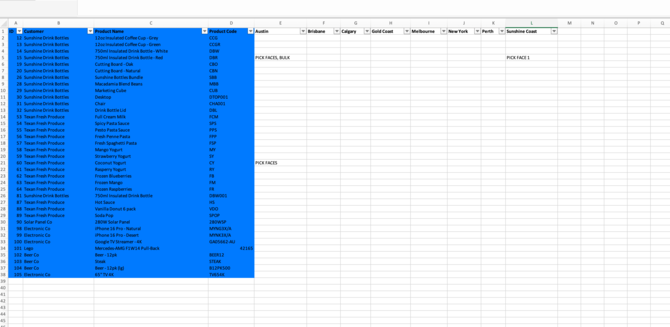
Important: The import only updates existing Products. It does not create Products. The file holds a maximum of 10,000 rows, including the header row.
Save the file.
Step 3: Import the file
- Navigate to the Products page, Warehouse > Products.
- Click More > Import Preferred Zones.
- Click Choose file, select the updated file and click Upload File.
- Click the bell notification in the top right corner, then click View Results Here to review the updated rows and any errors.
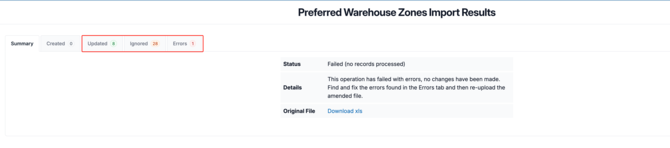
Note: When some rows fail, every other valid row in the file is still saved. Fix the failed rows in the file and import them again.
Preferred Zones rules and import errors
The following rules apply when you save the Preferred Zones tab and when you import the file. A validation error names the affected Warehouse so you can find and fix the problem.
|
Scenario |
Result |
|---|---|
|
A zone name does not exist on a Warehouse Location in that Warehouse, including a difference in upper or lower case |
The save or import row fails. The error names the Warehouse and the zone. |
|
The same zone is listed twice for one Warehouse |
The save or import row fails. The error names the Warehouse and the zone. |
|
More than 10 zones for one Warehouse |
The save or import row fails. The error names the Warehouse and the maximum of 10. |
|
Zones entered for a Warehouse the Product does not belong to |
The import row fails. |
|
A double quote in a cell is not closed |
The import row fails. The error names the Warehouse. |
|
The ID is blank or does not match a Product |
The import row fails. CartonCloud does not create a Product. |
|
A column header is not the name of one of your Warehouses |
The whole file is rejected and nothing is saved. The notification names the invalid header. |
Tip: To avoid unknown zone errors, check the zone name on the Warehouse Location first. Navigate to Warehouse > Warehouse Locations, open a Warehouse Location and check the Zone field.
Caution: If you rename a Warehouse Zone on your Warehouse Locations, the Preferred Zones on your Products do not update. Update the Preferred Zones on the affected Products so that In Zone continues to match Warehouse Locations in the renamed zone.