🔔 Note: this article is part of the CartonCloud Academy - WMS Basic Setup Trail. Please ensure you have read Get started with Organisation Settings - Warehouse first. 🎓
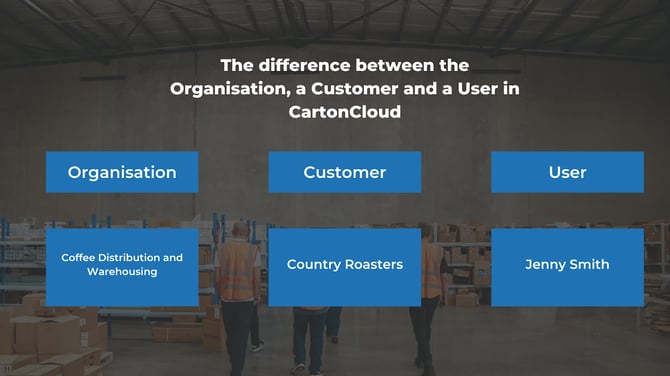
What is a Customer?
Customers in CartonCloud are the companies you provide goods or services to. They are the companies who own the stock in your warehouse or pay you for transport services.
For example, Coffee Distribution and Warehousing has a customer called Country Roasters. Coffee Distribution and Warehousing store the coffee beans for Country Roasters in their warehouse and deliver them to their customers as new orders come in. Country Roasters pay Coffee Distribution for their services; therefore, in CartonCloud, Country Roasters will be added as a Customer.
It is important to remember that the Customer is not the individual person working at the company; instead, individuals are Users (we covered users in the previous module) who then have Customer level access. For example, for Country Roasters, one of their employees would be added as a User.
You will be able to configure different settings for your Customers; for example, if you want to enforce a 2:00 pm order cut-off time for one customer and a 12:30 pm cut-off time for another, you can do so from within the Customer settings. We will cover Customer Settings in a later unit.
What other cool things can you set up for your Customers?
- Customer-specific reports that you and your customers can access (your customers will be able to access these reports once you create them a Customer User)
- Customer Notifications that you set up from the Customer Settings. These are email notifications that are sent to your Customers upon specific event milestones in CartonCloud.
- Specific document templates used for labels, proof of deliveries and more!
Add your Customers!
It's now time to add your first Customer! Follow along with Vincent, as he shows you how to add a Customer in CartonCloud.
Let's add your first Customer!
Before progressing through the following steps, please ensure you have some basic information for a current customer at your organisation. We will create this customer in your account.
Please note that you can set up more complex settings and configurations in later Trails. For now, we will only create the customer with basic setting configurations.
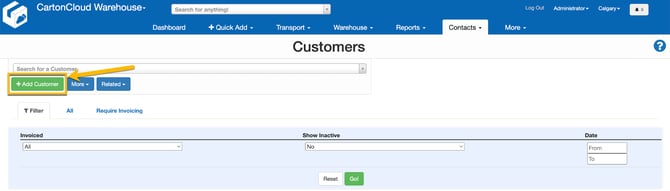
- Navigate to the Customers page, Contacts>Customers.
- Click +Add Customer in the top left corner.
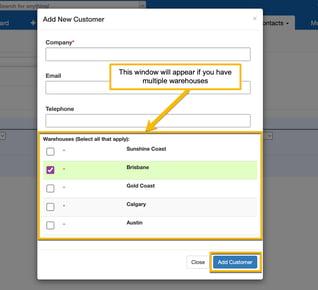
- Enter the Customer's name in the Company field.
- Enter the Email and Telephone associated with the Customer. This is not a mandatory field; therefore, it can be kept blank if you wish.
- If you have multiple warehouses set up, select the warehouse you wish this Customer to have access to. If you are storing goods for your Customer over multiple warehouses, ensure you select all applicable warehouses.
- Click Add Customer.
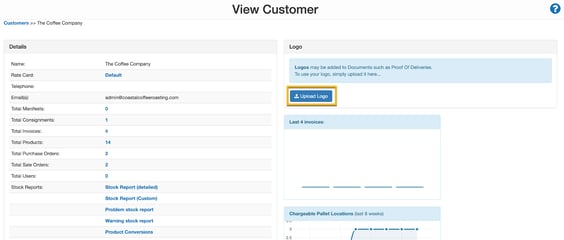
- Click Upload Logo to add a logo against the Customer.
Want to add more customers?
Once you have created your first customer and you feel ready to add more of your customers, you have a few options on how you can do this:
- Import customers in bulk - You can create multiple customers in bulk using the import/export feature. Note, when you use this option, the customer will be created with the default settings. See Adding Customers in Bulk for more information.
- Duplicate Customer - this allows you to create a customer easily with the same settings as the original customer. This is useful if you create your customers with similar settings and save time by having fewer customer settings to configure. See the Adding Customers and Duplicating Customers page for more information.
Configure your new Customer's Settings
Now that you have created your first Customer, you can configure some of the basic settings.
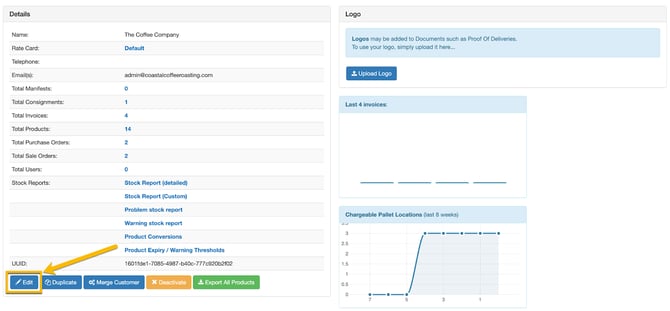
- Staying on the Customer page, select your customer and then scroll down and select Edit.
- Within the Basics tab, you can add the Telephone number, and Address and update the Rate Card associated with the Customer. We will cover Rate Cards in a later page.
Customer email notifications
Next, we will run through how to set your Customer up on email notifications. Email notifications are emails delivered to your customers upon certain event triggers and milestones.
For Nick at Coffee Warehousing and Distribution, his customer Country Roasters have requested their admin staff receive emails when a new Sale Order is entered and when the order has been packed. In addition, they would also like their purchasing team to receive an email when their stock quantity reaches a certain level. Nick knows he can set all of these notifications up for the customer and does so from the Customer Settings. Follow the below steps to see how Nick can set up different notifications for different event milestones and to be sent to different email addresses for his customer.
Note: if you are following along in your account, it is recommended that you add your email address rather than your customer’s email address for the initial testing phase of using your CartonCloud account. You wouldn’t want your customer receiving an email about a test order in your account! Once you have finished all your testing, you can update the email address to be your customers!
How to set up email notifications from the Customer Settings
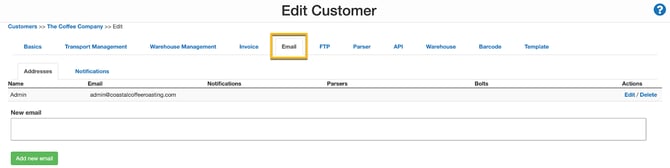
- Select the Email tab.
-
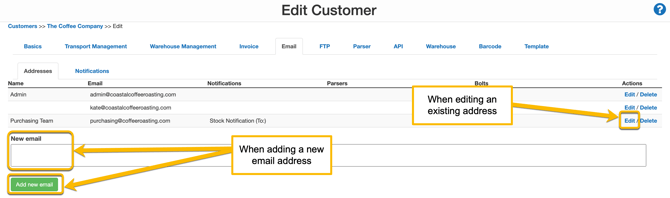
From here, you can add a new email address and enable the relevant email notifications. Nick will need to create two separate notifications, one for the admin email and one for the purchasing team email address. For now, he will create the admin email notification for sale order import and packing.
-
To add a new email address, enter the address in the New email box and click Add new email.
It is recommended you add your email address, for now, to avoid your customer receiving notifications whilst you are setting up/testing your account.
- Enter a name in the Name field at the top of the page.
- Scroll down and tick the notifications you wish the email address to receive. For Nick, he will select the Sale Order notification.
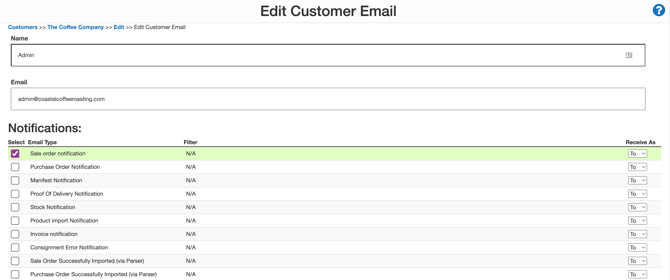
- Scroll down and click Save.
- If you already have an email address against the customer, you can click Edit against the address to enable the notifications.
- You will now need to enable the notifications you selected for that email address within the Notifications tab.
- Navigate back to the Customer settings within the Email tab and click the Notifications tab. Nick will need to select ‘Send Email when Sale Order is packed’ and ‘Send Reply Always’ from the drop-down menu under ‘When to send a Sale Order Import Notification’.
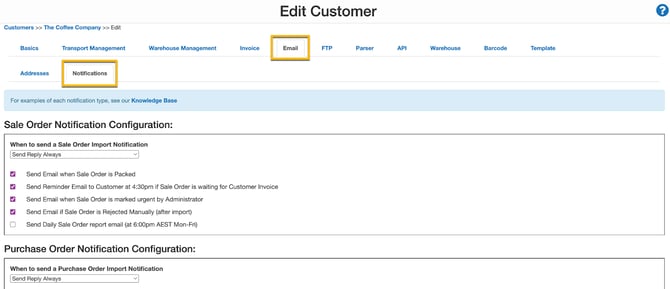
- Scroll through and select the relevant notifications you need to enable. Note that for every notification you enabled within the different email addresses, you will need to enable them from this Notifications tab.
- Scroll down and select Save.
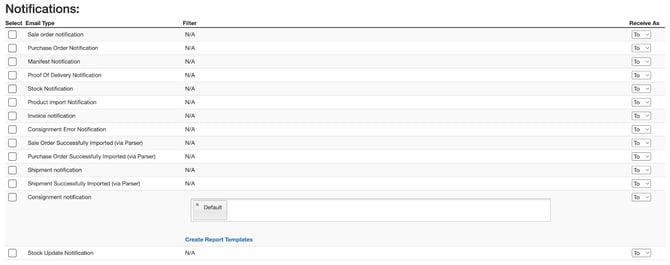
When Nick adds the purchasing team email, he will need to select ‘Stock Notification’, and then from the Notifications tab, he will need to select ‘Send Stock Warning / Expiry Notification Email (at 8:00 am AEST Mon-Fri)’.
▶️ Follow along in the WMS Basic Set Up Trail...next up is Introduction to Users in CartonCloud - Warehouse 🎓