Table of Contents
- Purpose
- How to set up Replenishment
- Export/import Replenishment settings
- The difference between Organisation Settings and product level Replenishment set up
Please note this is a WMS Premium only feature. For more information on WMS Premium and to upgrade your account please reach out to our Service Desk team here.
Purpose
To set up Replenishment, you will need to do so at the Organisation Settings and Product-Level. Replenishment is product-specific, meaning that you will need to activate and configure Replenishment at the product level for each product you wish to use Replenishment for.
See the difference between Organisation Settings and Product Level set up at the end of this article for more information on the difference between the two configurations.
How to set up Replenishment
Follow the below steps to set up Replenishment:
Please note that when running a Replenishment the Stock Selection Method is taken into consideration with the below settings when selecting stock for the Replenishment.
1. Configure Replenishment from the Organisation Settings
-
Navigate to Organisation Settings (More>Organisation Settings).
-
Select the Warehouse tab.
-
Scroll down to the bottom of the page to the heading Replenishment Configuration.
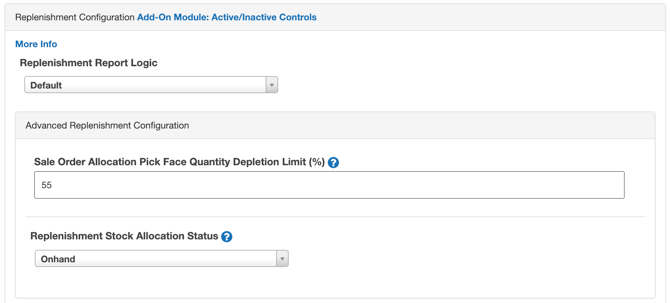
- Select the Replenishment Report Logic you wish to use.
- Default: standard replenishment logic which uses the Replenishment Quantity Configuration settings defined at the Product level
- Overstock from Sale Order demand: uses the default report logic and will look at the level of stock required for Sale Orders in awaiting pick and pack status and will conduct an over replenishment to compensate for these Sale Orders. When running the Replenishment, the report will highlight if the move is for stock relating to a Sale Order in pick and pack status or not
- If you wish to apply a limit to the quantity of product picked from a pick face for a Sale Order, apply a percentage in the No Limit text bar under Sale Order Allocation Pick Face Quantity Depletion Limit. The percentage is calculated using the maximum quantity threshold or highest unit of measure from the product if the threshold is blank.
-
Select the Replenishment Stock Allocation Status you wish to use. This will determine what stock is being used to replenish the pick face locations.
-
Onhand: uses all stock in the warehouse, including stock currently allocated to a Sale Order (only for orders that have not been picked or packed yet). This is useful as it will help move stock that is already allocated to a Sale Order into pick face locations, ready for when the order needs to be picked. Note, it is strongly advised if you are using this setting not to process Sale Orders for that product whilst conducting the Replenishment.
-
Free: only includes stock available in the warehouse and is not allocated to a Sale Order. It is advised you use this status if you are planning to process Sale Orders while conducting the Replenishment, as the stock allocated to a Sale Order will not be utilised to replenish the pick faces.
-
- Choose if you wish to enable Use Last Allocated Location for Minimum Trigger. This setting, when enabled, changes how minimum stock replenishment is triggered for products without a dedicated pickface. Instead of evaluating each location independently, CartonCloud will only check the last location where stock was allocated before determining if replenishment is required.
-
Select Save.
2. Create Pick Face locations
To create Pick Face Locations, see Adding Warehouse Locations.
If you would like to change your existing Warehouse Locations into Pick Face Locations, follow the below steps:
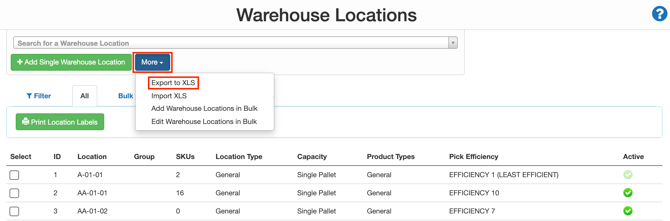
- Navigate to the Warehouse Locations page by typing Warehouse Locations into the Search for anything bar.
-
Select More and Export XLS.
- Open the downloaded XLS file.
-
You will see all your Warehouse Locations. For the Warehouse Locations you wish to change to a Pick Face Location, change the efficiency level in column K.
-
You will need to change the efficiency level to a number between 21 and 30 (30 being the most efficient) to update the location to a pick face location.
-
Save the file once you have made the changes.
-
In CartonCloud, on the Warehouse Locations page, select More and Import XLS.
-
Select the file and select Upload file.
-
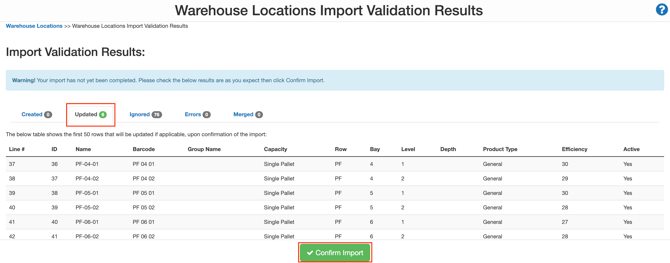
You will be directed to the Import Validation Results page. Select the Updated tab to view all updated Warehouse Locations.
-
Check you have modified the correct Warehouse Locations and click Confirm Import.
-
You will then receive the success banner message that the import was successful.
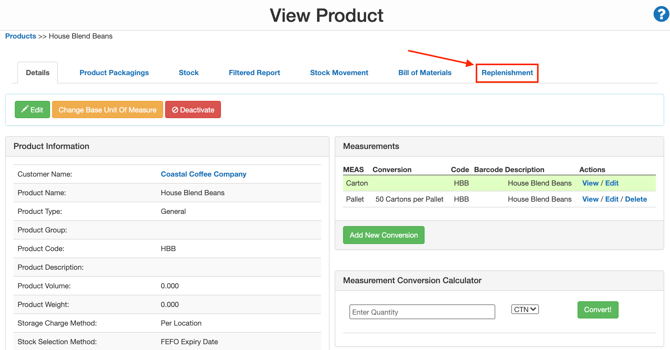
3. Enable Replenishment from the Product level
Once you have enabled Replenishment from the Organisation Settings, you can then configure Replenishment on a Product level for the Products you wish to use Replenishment for.
It is recommended that once you have set up one product for Replenishment, you use the Export/Import function to set up other Products in bulk.
To enable Replenishment for a Product:
-
Navigate to the Products page (Warehouse>Products).
-
Select the applicable Product you wish to activate Replenishment for.
-
Select the Replenishment tab.
-
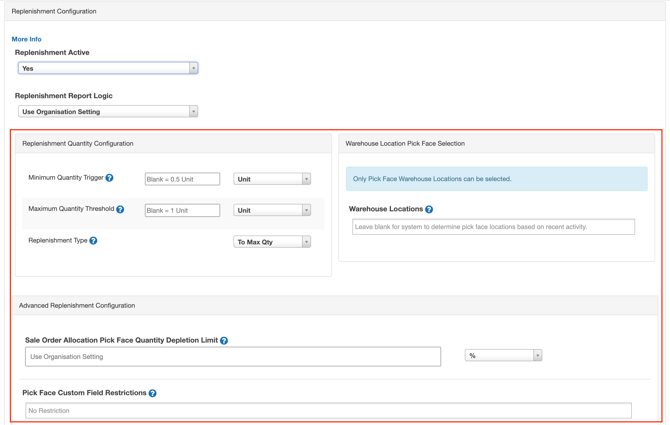
Select Yes from the Replenishment Active drop-down menu.
-
As the default, Replenishment Report Logic will be set to Use Organisation Settings. This will apply the logic you selected in Organisation Settings. If you wish to override these settings on a product level, select the applicable setting (either Default or Overstock From Sale Order Demand) from the drop-down menu.
-
To customise the Product Replenishment configuration, fill in the fields highlighted below. If left blank, the default settings will be applied (the default setting is defined below).
|
Field |
Description |
|---|---|
|
Replenishment Quantity Configuration |
|
|
Minimum Quantity Trigger |
Once the quantity goes below the set value, the replenishment will be triggered. Default is 50% of the largest unit of measure. |
|
Maximum Quantity Threshold |
The maximum quantity that the location will allow to replenish up to. Default is 1 of the largest unit of measure. |
|
Replenishment Type |
Define how to replenish and, for some types, the amount to replenish. To Max Qty: when the replenishment triggers, it will bring the quantity back up to the maximum quantity. UOM Lots defined: the amount you would like to replenish in each move until the maximum quantity is reached. The quantity to replenish will be rounded to the UOM. Exact Qty defined: you can define the exact quantity you wish to replenish regardless of the maximum quantity. This means the maximum quantity can be exceeded. |
|
Warehouse Location Pick Face Selection |
|
|
Warehouse Locations |
Select the pick face location being utilised for the Product. This is the pick face location that will be replenished. There is no limit to the number of pick face locations you can select. If left blank, CartonCloud will select the pick face locations that either have this product in them or the last stock in the location was this product. |
|
Advanced Replenishment Configuration |
|
|
Sale Order Allocation Pick Face Quantity Depletion Limit |
You can apply a limit to the quantity of Product that can be picked from a pick face for a Sale Order. This depletion limit can either be a percentage or unit. The default will apply the configurations set at the Organisation Settings level. |
|
Pick Face Custom Field Restrictions |
Select which product custom fields must be unique in the same location during Replenishment. For example, if a product in that location has a certain expiry date, then only other products with the same expiry date may be replenished into the location. The default is no restriction. |
Export/Import Replenishment Settings
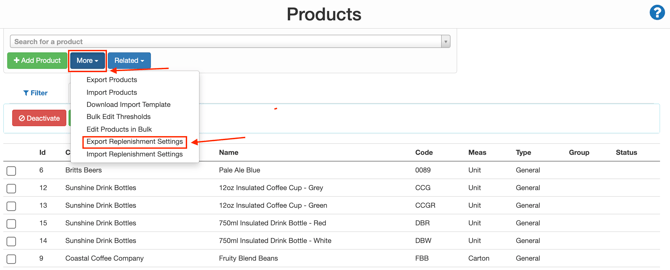
Once you have set up Replenishment for one Product you can use the Export/Import function to set up Replenishment for other Products in bulk.
To use the export/import function:
-
Navigate to the Products page (Warehouse>Products).
-
Click More.
-
Select Export Replenishment Settings.
-
This will export all Products (even if Replenishment hasn't been activated) and their current Replenishment settings into an xsl file type.
-
Fill in the applicable columns on the file (some columns will have drop-down options).
-
Leave the first four columns as is (they are highlighted blue).
-
Save the edited file.
-
Return to the Products page within CartonCloud and select More and then Import Replenishment Settings.
-
You will receive a success message once the Products have been imported.
-
Select the bell notification in the top right corner and select View Results Here.
Note, by hovering over the text box highlighted with your mouse, and a message will appear informing you on what has been updated or, if there is an error, what the error relates to.
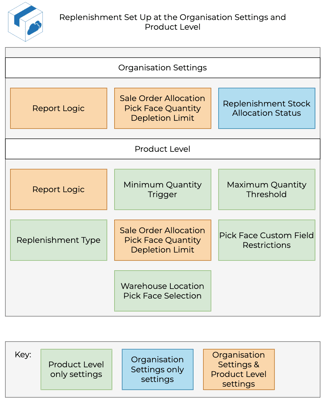
The difference between Organisation Settings and Product level Replenishment set up
The Replenishment configurations you set up in the Organisation Settings will apply to all your Products unless you choose to alter these at the product level. In addition, certain settings are product-specific, meaning you can only configure them at a Product level. This is helpful if you wish to use different Replenishment logic for each of your Products.
The below diagram highlights the different Replenishment settings and at what level they can be configured.