
Table of Contents
- What is a Manifest
- Manifest Statuses
- Manifest usecase examples
- How to create a Manifest
- When the Manifest arrives at the warehouse
- Verifying a Manifest
- Reverting a Verified Manifest
What is a Manifest
A Manifest in CartonCloud is a grouping of Consignments for one customer on a single date that are moving together. This function was originally built for cross-docking with the idea that the Manifest can be used to check off the receipt of Consignments during a pickup.
Manifest Statuses
|
Status |
Description |
|
Booked |
The Manifest has been created but has not yet arrived at the warehouse. |
|
In Warehouse |
The Manifest has arrived at the warehouse. Consignments can now be sorted and allocated to Delivery Runs. |
|
Verified |
All sort arrivals have been completed (or the Sort Arrivals step has been bypassed) and the Manifest has been confirmed as fully processed. This is the final status in the Manifest lifecycle. A Manifest in Verified status can be reverted to In Warehouse if further sorting is required. |
Note: Manifests that remain in In Warehouse status for more than 7 days are automatically updated to Verified by the system.
Manifest usecase examples
Example 1 - Manifest pickup
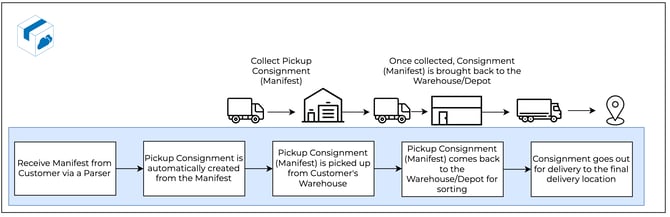
In this example, the Customer has sent through a Manifest (via a parser) of all Consignments that need to be collected from their warehouse. Upon receiving the Manifest, CartonCloud automatically creates a Pickup Consignment (if configured in the Customer Settings). The Manifest Pickup Consignment can then be collected and brought back to the warehouse/depot to be sorted before being dispatched for delivery to the final destination.
Example 2 - Manifest pickup and deliver
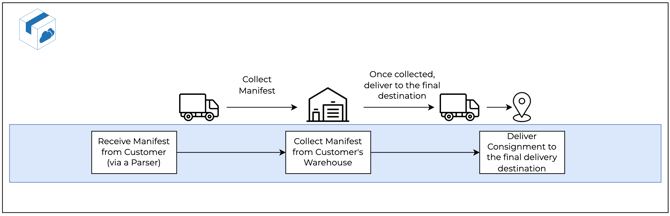
In this example, the Customer has sent through a Manifest of all Consignments that need to be collected from their warehouse. The Manifest will be collected and then delivered in one movement.
Example 3 - Manifest is already at the warehouse
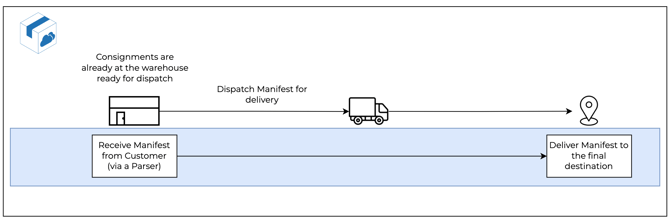
In this example, the Customer has sent through a Manifest of all Consignments that need to go out for delivery. The Consignments are already at the warehouse and do not need to be collected (for example, they have come from a Sale Order).
It is best to use a Manifest when you have multiple Consignments that will fit onto one truckload. It is less advantageous to use a Manifest when you have several full truckloads of Consignments.
How to create a Manifest
There are two ways a Manifest can be created.
1. Through a Parser file
-
Contact our Support Team to set up the Manifest parser.
-
Once the Manifest Parser has been added, configure the Parser to the applicable Customer (follow the steps here).
-
The Parser can then be imported by the Customer or yourself through the Parse a File page.
-
The Manifest with all associated Consignments will now be in CartonCloud.
Downloading the Original Manifest File
When you import a Manifest via a Parser you have the option to download the Manifest from the View Manifest Page. To do so:
-
Navigate to the Manifest page, Transport>Manifests.
-
Select the applicable Manifest.
-
Select the Details tab.
-
Select the blue Download button next to the Download Original Manifest File heading.
Note, this button will not appear for a Customer user if there is more than one customer associated with the Manifest.
2. When creating a new Consignment
Depending on what settings you have configured in your Organisation Settings will determine how you create a Manifest from a new Consignment.
To configure the Manifest settings:
-
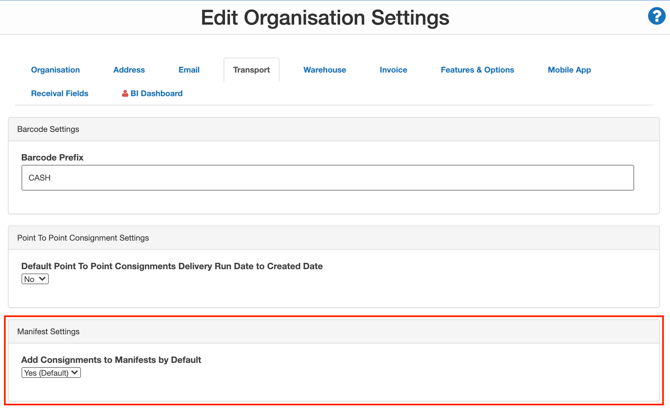
Navigate to Organisation Settings (More > Organisation Settings).
-
Select the Transport tab.
-
Within the Manifest Settings box select if you wish to Add Consignments to Manifests by Default by selecting Yes (Default) or No.
-
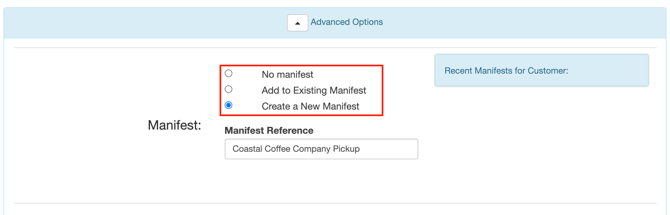
If you select Yes, the Create New Manifest will already be selected by default when creating a new Consignment. If you select No, the No Manifest option will already be selected by default.
To create a Manifest from a new Consignment (when the setting Add Consignments to Manifests by Default is No):
-
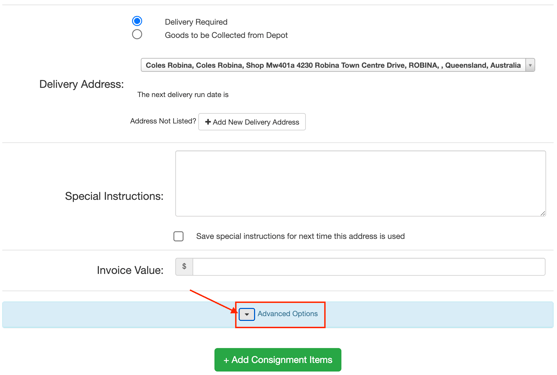
When creating a new Consignment, fill in the applicable information and then select the drop-down arrow next to Advanced Options (at the bottom of the screen).
To create a Manifest from a new Consignment (when the setting Add Consignments to Manifests by Default is Yes):
-
When creating a new Consignment, fill in the applicable information.
-
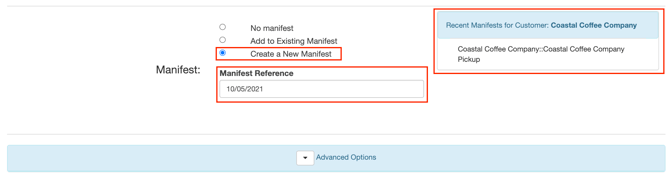
At the bottom of the screen within the Manifest section, the Create a New Manifest option will already be selected by default.
-
Type in the Manifest Reference.
-
Alternatively, you can add the Consignment to one of the Customer's existing recent Manifests by selecting a Manifest from the displayed list under, Recent Manifests for Customer.
When the Manifest arrives at the warehouse
When a Manifest arrives at your warehouse you will need to manually update the status to In Warehouse.
To update the Manifest to In Warehouse:
- Navigate to the Manifests page (Transport > Manifests).
- Select the tick box next to the applicable Manifest.
- Select Update to In Warehouse.
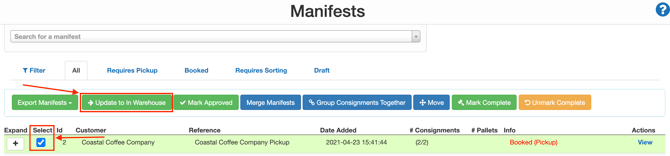
To be able to allocate Consignments that are from a Manifest onto a Delivery Run, the Manifest must be updated to In Warehouse.
Once you have updated the status of the Manifest to In Warehouse you can then sort the Manifest.
To sort the Manifest:
- Select View on the applicable Manifest in the Actions column on the Manifests page.
- Select Sort Arrivals.
- Check the box next to the Consignments you wish to confirm (the ones that have arrived). If not all Consignments arrived at the same time see How to split a Manifest.
- Select Confirmed.
Verifying a Manifest
Once you have sorted the Manifest arrivals, you can complete the verification process to move the Manifest to Verified status. Verifying a Manifest confirms that all processing is complete and the Manifest is ready to move to its final state.
To verify a Manifest after completing Sort Arrivals:
- On the Sort Incoming Manifest page, review the confirmed consignments.
- Select the Complete Verification button at the bottom of the page.
- If all consignments have been confirmed, the button displays in green. Select Complete Verification to update the Manifest to Verified.
- If not all consignments have been confirmed, the button displays in orange. Select Complete Verification and a warning will appear asking you to confirm. Select Proceed to continue, or Cancel to return and confirm any outstanding consignments.
Tip: Not all consignments need to be sort confirmed before selecting Complete Verification. If some consignments did not arrive, you can still proceed — use the orange button and confirm the warning to continue.
To bypass Sort Arrivals and move directly to Verified:
If your Consignments do not require sorting (for example, they are already allocated and ready for delivery), you can skip the Sort Arrivals step entirely.
- Navigate to the Manifest page, Transport > Manifests.
- Select View on the applicable Manifest.
- From the View Manifest page, select Bypass Sort Arrivals.
- The Manifest status updates to Verified. The sort confirmed status of individual consignments is not changed.
Note: The Bypass Sort Arrivals option is only available when the Manifest is in In Warehouse status. The Complete Verification and Bypass Sort Arrivals actions require the Change Manifest Status permission. Contact your Administrator if these options are not visible to you.
Reverting a Verified Manifest
If a Manifest has been moved to Verified status but further sorting is required, you can revert it back to In Warehouse status.
To revert a Verified Manifest:
- Navigate to the Manifest page, Transport > Manifests.
- Select View on the applicable Manifest.
- From the View Manifest page, select Revert Status.
- The Manifest status returns to In Warehouse. The existing sort confirmed status of individual consignments is not changed.
Note: Reverting a Manifest to In Warehouse does not reset individual consignment sort confirmed statuses. You will need to manually update any consignments as required.