Table of Contents
- Purpose
- How to invite/create a new user
- Additional settings
- User role specific settings
- Accepting a CartonCloud user invitation
- Troubleshooting
Purpose
For someone to access CartonCloud they need to be created or invited as a User first.
Follow along Vincent as he steps through how to add a new User to your CartonCloud account.
How to invite/create a new User-
Navigate to the Users page (Contacts>Users).
-
Click on +Invite New User. The below screen will appear.
-
Fill in the name and email field with the user's details.
It is recommended that for staff who do not have their own email address that you select the Create User option and use a placeholder email instead (the email is only used as login details).
-
You have two options when generating a new User, you can either invite or create the User. To create a user tick the Create User Now box.
-
Invite User: select this option if you wish to send an email invitation to the user and have them create their own password. This option is best for Customers and staff with Administrator access.
-
Create User: select this option if you wish to create the user immediately and set up their password on their behalf. This option is best for internal staff such as Packers and Drivers.
-
-
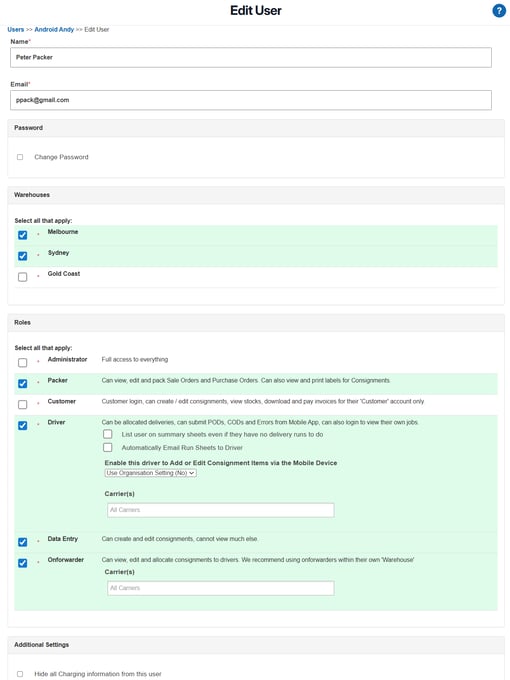
Fill in the remaining fields using the below field descriptions.
|
Field |
Field Description |
|
Additional Settings |
Provides the option to hide all charging information from this user. |
|
Create User Now |
Tick the box next to Create User Now if you wish to create the user rather than invite them. Invite user: do not tick this box if you wish to invite the user. Create user: tick the box to create the user and password immediately. If Create User Now is ticked an extra option Generate Password Automatically will appear. This will automatically set a password up for the user and display it on the screen upon submitting the form. |
|
|
Invite user: this is where the invitation will be sent. Upon accepting the email the user can then change the email address if they wish. Create user: if the user does not have an email address, a placeholder email can be utilised instead. |
|
Roles |
Select the Roles you wish to enable for the user. There is no limit to the number of roles a user can have. A brief overview of each role is provided on the page. For more information on each role see User Roles Explained. Note, if you would like the user to have access to the mobile application, the Packer or Driver role must be ticked. |
|
Subscribe |
If you wish the user to be subscribed to CartonCloud Newsletters. We recommend leaving this ticked so the User will receive important product updates related to CartonCloud. They are able to unsubscribe at any time if they wish. |
|
Warehouses |
Tick the applicable warehouses the user will be operating within. See Setting up Warehouses (Multiple Sites) for more information. |
Additional Settings
For each user, you have the option to hide all charging information. This includes:
-
The Charges tab will be hidden on Sale Orders, Purchase Orders and Consignments
-
Rate Cards will not be visible.
-
Invoices will not be visible.
User Role Specific Settings
Some User Roles have specific settings that you can choose to apply.
|
User Role |
Setting |
Explanation |
|
Driver |
List user on summary sheets even if they have no delivery runs to do |
When enabled, the driver will appear on summary sheets regardless of whether they have delivery runs to complete. |
|
Driver |
Automatically Emal Run Sheets to Driver |
When enabled, the driver will be emailed their Run Sheets automatically. |
|
Driver |
Enable this Driver to Add or Edit Consignment Items via the Mobile Device |
When enabled, the driver will have the ability to add and edit Consignment Items from the mobile app. Setting options: Use Organisation Settings: will apply the settings configured at the Organisation Settings level. Enabled: regardless of the settings configured at the Organisation Settings level, the driver will be able to add and edit Consignment Items via the mobile app. Disabled: regardless of the settings configured at the Organisation Settings level, the driver will NOT be able to add and edit Consignment Items via the mobile app. Please see Add/edit Consignment Items for Drivers on the Mobile App for more information. |
|
Administrator |
Allow this user to edit other users |
When enabled the user will be able to edit other users. If the user has this permission enabled it will appear as Yes on the Users list view screen under the heading 'Can edit users'. |
|
Administrator |
Allow access to the BI Dashboard |
This setting is only available if the user has 'Allow this user to edit other users' enabled. This will give the user access to the Business Intelligence Tool if the account has the BI Dashboard enabled. The BI Dashboard is a paid add-on feature. Note, that WMS Premium accounts will have access to unlimited BI Dashboard users, however, for non-WMS Premium accounts additional users will be an additional cost. Please reach out to our Service Desk team if you have any questions. |
|
Onforwarder |
Carrier(s) |
Choose which Carriers the user will have access to. |
Accepting a CartonCloud User Invitation
If needed, new users can get assistance with accepting their invitation from the video below.
What to do if the user accepts the invite but cannot seem to access the Tenancy or Customer
One thing to keep in mind is that a CartonCloud User has a single login to view all the tenancies (3PL warehouses) and customers they have access to.
This means if you invite them to your tenancy they will need to manually select to view your tenancy from the drop-down menu.
If a user you have invited is reporting not being able to access your Tenancy or Customer. Please first ask them to double-check they have attempted to select it in the drop-down menus shown below.
-
The top drop-down menu allows the user to move between tenancies.
-
The bottom drop-down menu allows the user to move between Customers within those tenancies.
Troubleshooting
It's very common for invitation emails to end up in spam or junk folders, so it's always a good idea to have the User check those locations as well for their invitation.
What to do if the user accepts the invite but cannot seem to access the Tenancy or Customer:
- One thing to keep in mind is that a CartonCloud User has a single login to view all the tenancies (3PL warehouses) and customers they have access to.
- This means if you invite them to your tenancy they will need to manually select to view your tenancy from the drop-down menu.
- If a user you have invited is reporting not being able to access your Tenancy or Customer. Please first ask them to double-check they have attempted to select it in the drop-down menus shown below.
-
The top drop-down menu allows the user to move between tenancies.
-
The bottom drop-down menu allows the user to move between Customers within those tenancies.
What to do if the user is deactivated due to an unverified email address:
CartonCloud automatically deactivates users whose email addresses remain unverified after account creation. This is a security measure to ensure only verified users can access the system.
-
To resolve this issue:
-
Re-enable the user account (You may need to reach out to CartonCloud Support to re-enable the User):
-
Navigate to Contacts > Users.
-
Use the Filters to locate the deactivated user.
-
Click Edit next to the user and set Active to Yes.
-
Click Save.
-
-
Ask the user to verify their email:
-
Once the user is re-enabled, they need to log in.
-
Direct them to Settings at:
https://app.cartoncloud.com/settings -
From their Settings page, they can complete the email verification process.
-
✅ Email verification must be completed to prevent automatic deactivation in the future.
-