|
Field |
Description |
|
Capacity |
The Capacity field impacts the way in which Storage Charges are calculated. Single Pallet: This is suitable for locations which normally only store a single pallet. For example, locations within Pallet Racking, ie: A-01-01. All stock loaded into the location is treated as being on a single pallet. All items loaded into this location are treated as being on the same pallet, and therefore, if Location-based Storage Charges are used, will only charge a single pallet for Storage. Multiple Pallets: Suitable for locations which store multiple pallets, for example bulk locations such as "Freezer Floor", or "Loading Room 3". When stock is allocated to Multiple Pallet locations, Individual "Pallet Ids" are created, so by default each stock record is treated as it's own pallet (and charged as it's own pallet). You have the ability to load multiple stock records onto the same Pallet Id, however this is not the default behaviour. |
|
Estimated Max Number of Pallets |
This is a required field when adding a Multiple Pallet Warehouse Location. The estimated number of pallets that can be added to each location. If you are unsure what the estimated max number of pallet is please enter 1. |
|
Name |
The name of the Warehouse Location, for example A-01-01. Names can be automatically generated based on Row, Bay, Level and Depth. |
|
Zone |
The Warehouse Zone associated with the Warehouse Location. A Zone groups Warehouse Locations together and allows for efficient warehouse planning and operations. For more information please see Warehouse Zones. |
|
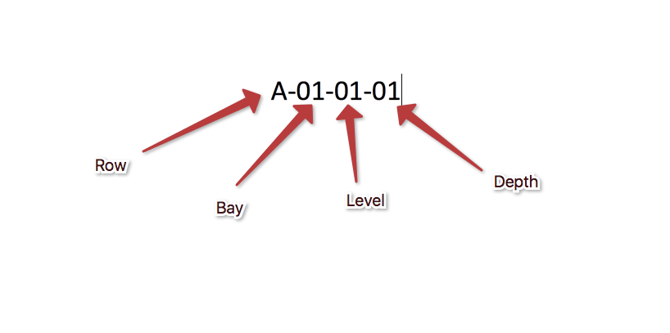
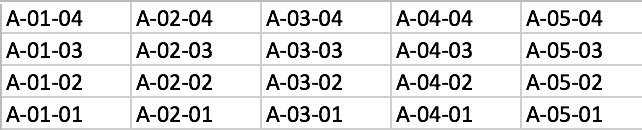
Row, Bay, Level, Depth |
This only applies to Single Pallet Locations. It is recommended the locations are named as follows:
Example of racking when looking from the front (assuming this is single-depth ranking).
Examples: A-01-01 → Bottom left corner in the line. |
|
Charge Group |
All locations with the same Charge Group will be charged as a single location. This is useful when you have an area of small shelves that is charged as a single rate (for all), by giving all the shelf locations the same Charge Group, they'll be treated as a single location when calculating storage charges. See: Storage Charges (this feature only works with the 'Per Location' storage charge method) |
|
Location Barcode |
When scanning location labels, by default CartonCloud looks at the location name, if this matches the barcode, ie: "A-01-01" then it'll match. However, in some cases there are existing barcodes on the warehouse racking, which CartonCloud can re-use. |
|
Location Type |
The Product Type of the location, for example: Chilled, Frozen, Ambient. This can be used to control what the location is able to hold, and also how it's charged (if Charge Type Product Option is set to "Warehouse Location") Note, you can only update and existing Warehouse Location's Location Type when there is no stock in the location. If you need to update the Location Type of an existing Warehouse Location you will need to move the sock out of the location first. |
|
Accept Products of Type (Associated Product Types) |
This allows you to specify which Product Types can be stored in the location. By default this is just the Location Type of the location. |
|
Pick Efficiency |
Pick Efficiency is used when selecting which stock to use automatically (see How CartonCloud chooses outgoing stock - Stock Selection Methods for more information). The Pick Efficiency ranges from 1 (being the least efficient) through to 20 (being the most efficient). If creating Pick Faces (for Replenishment) you will need to select a Pick Efficiency between 21 and 30 (30 being the most efficient). Normally, locations that are at ground level, or can be reached by hand, would be considered highly efficient. However, locations that require a fork-lift (or are in deep-racking) would be less efficient. |