Table of Contents
- Purpose
- Benefits of using low stock notifications
- When is a low stock notification sent?
- How to set up low stock notifications
Purpose
In CartonCloud, you have the ability to set up low stock notifications for your customer's products. You can choose what level the stock needs to reach before a notification is sent to your customer (or the specified email address).
Benefits of using low stock notifications
-
Increased visibility for your customer
-
Automatic updates without manual work or intervention
- Reduced number of emails/communication with your customer as they are notified automatically and instantly
When is a low stock notification sent?
A low stock notification will be sent out the day that the on-hand quantity goes below the threshold. The notification will only be sent out once. The notification will not be sent again until another instance when the on-hand quantity goes below the threshold (note, the on-hand quantity must first go back above the threshold before it goes back down below the threshold again).
How to set up low stock notifications
To set up low stock notifications for your customer, you need to complete two steps:
1. Enable the low stock notification against the relevant product and set the low stock threshold
There are two ways you can enable and set the low stock notification (a) individually against the product or (b) in bulk using the export/import feature
Update an individual Product:
-
Navigate to the relevant Product, Warehouse>Products.
-
Edit the Product.
-
Scroll down to where the Expiry Threshold Days are set. You will see a tick option, Enable Low Stock Notification.
-
Tick the Enable Low Stock Notification option.
-
The Low Stock Threshold field will then appear. Enter the threshold level.
-
Scroll down and select Save.
Update Products in bulk:
-
Navigate to the Products page, Warehouse>Products.
-
Select More>Export Products.
-
Open the downloaded file.
-
Scroll across to the column labelled Low Stock Notification.
-
To enable it, type Yes for the row of the relevant Products.
-
In the column labelled Low Stock Threshold, enter the threshold quantity.
-
Save the file.
-
Navigate back to CartonCloud and the Products page.
-
Select More>Import Products. Select the file to upload.
-
Once the file is processed, the Products will be updated.
2. Enable the low stock notification against the customer and the relevant email address
Note, to set up email notifications, you need to ensure the applicable notifications are selected in the Notifications tab. If you do not make a selection in the Notifications tab, the notifications will NOT work.
-
Navigate to the Customers page, Contacts>Customers.
-
Select the relevant Customer.
-
Click Edit.
-
Select the Email > Addresses tab.
-
If the email address is already listed, click Edit against the email address.
-
if the email address does not exist, type the address into the New email field and click Add new email.
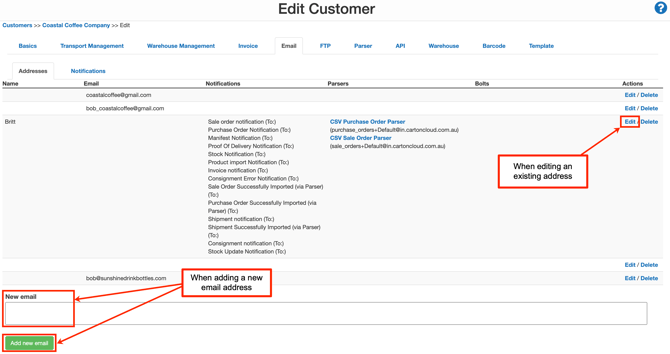
If you are adding a new email address, ensure you enter a name in the Name field.
-
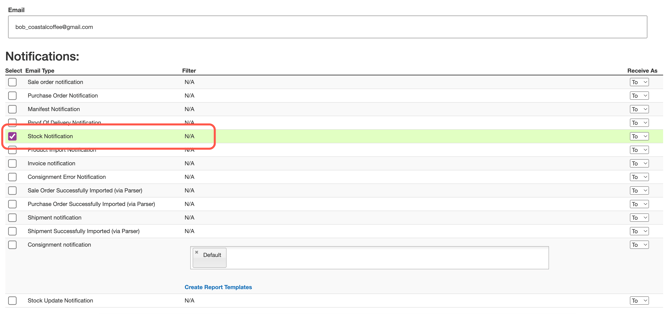
Tick the Stock Notification option and any other notifications you wish to set up for this email address.
-
Scroll down to the bottom of the page and select Save.
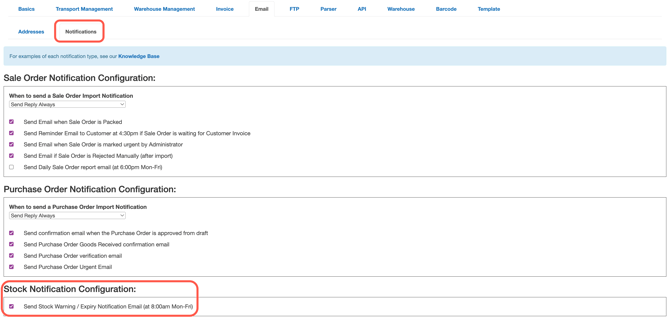
You need to select notifications within both the Addresses and Notifications tab. Email notifications will not work if you do not select the appropriate notifications from the Notifications tab.
-
Select the Notifications tab. This tab gives you greater control over what type of notifications you wish to enable. For example, if you selected Purchase Order Notifications against the email address in the Addresses tab, you would then need to select what type of Purchase Order notifications you want to enable from the Notifications tab. You will need to ensure the Stock Notification Configuration is ticked.
-
Tick the relevant Notifications you wish to enable.
If you have ticked a notification against an email address, you need to ensure they are also ticked in the Notifications tab in order for the notification to work.
-
Scroll down to the bottom of the page and select Save.