Table of Contents
Automatic Invoice Generation
|
Field |
Description |
|
Automatically Generate Invoice |
No - The invoices for this Customer will not be generated until you manually select for it to generate. Yes (only at end of the Invoicing period - The invoice will be created by the system on the date specified within the settings. Yes (continually build during the invoice period (Leeching Invoice) - An invoice will be created for the customer automatically and charges will be added each day until the end of the invoicing period. |
|
Next Invoice Date |
This allows you to override the date provided within the Organisation Settings and make the date specific to this customer |
|
Repeat Every x Weeks/Months/Days |
This allows you to override the occurrence provided within the Organisation Settings and make it specific to this customer |
|
If no charge errors exist upon Automatic Invoice Generation |
Automatically Upload Invoices to Xero Automatically Email Invoice (with Xero PDF attached) and Mark Invoice Approved |
Invoice Dates:
There can be differences between your invoice dates and your storage periods, they can be quite different (e.g. weekly storage and monthly invoicing). If you want them to match and be the same, then please follow the instructions below, alternatively, the dates can be changed if they are required to be different. If they are different then the Storage Periods will still go on the next Invoices, they just won't match to the same Invoice Dates. To ensure you have your Storage Charges for a date period automatically added to your next invoice with the same date period, you need to:
- Make sure your storage info matches your invoice info: Organisation Settings → Invoice Tab → Check if your "Default Next Invoice Date" and "Default First Day Of Week" match your "Storage Starts On" date. Also, the Default First Day of Week should match the Storage Starts on. For example, in this case, both are Monday, if these are different then the storage periods won't sync with the invoices.
- Make sure your Organisation Settings Invoice matches your Customer Invoice Settings
- Go to Organisation Settings → Invoice Tab → Check your Default Next Invoice Date:
- Go to Customers → Select the Customer → Edit → Invoice Tab → Check your Next Invoice Date:
- If the customer has a different start date than what's been configured under the Organisation Settings, it will cause issues. Both dates need to be the same.
The Date described for Invoices is the date following the end of the period i.e. if Sunday was on the 10th, then you would select the 11th as the date for the Invoice to create, which would be for a date period of the 10th backwards for a week/month whatever set. This is because the date periods end at midnight and then the invoice is created shortly afterwards, so you're telling the system to create it in the early morning for the day prior backwards. In the case below if the Storage and Invoice days started on Monday for a week, then the period would end on Sunday → , therefore, the next invoice date in Invoice settings at Organisation and Customer levels should be the Monday causing a Sunday back to Monday date period.
Invoice Summary Excel Sheet
|
Field |
Description |
|
Show the period the Invoice covers on the cover sheet of the invoice |
Enabling will display the time period the invoice is for on the cover sheet of the invoice. |
|
Show Warehouse name on the cover sheet of the Invoice |
Enabling will display the name of the Warehouse (which can be found at the top right of the web app) on the cover sheet of the invoice. |
|
Show all invoice totals on the cover sheet of the Invoice |
Selecting this option will cause the invoice summary to display the information highlighted in red below. |
|
Cover Sheet Tax Statement |
Text that will appear on the cover sheet of the Invoice Summary. |
|
Cover Sheet Note Text |
Text that appears at the bottom of the cover sheet of the Invoice Summary. |
|
Date Shown on Sale Orders |
Allows you to configure the date shown for a Sale Order on an Invoice:
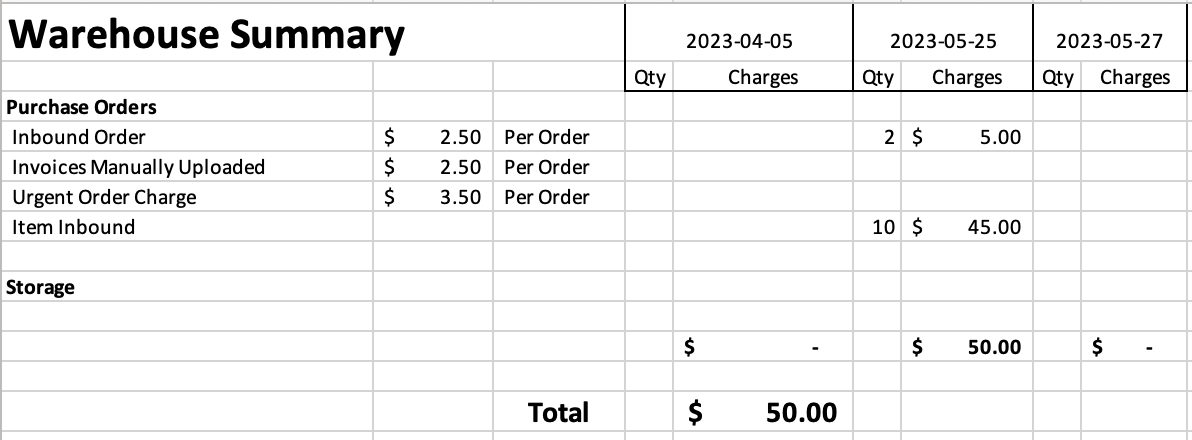
Note that these settings will change the date shown on the Warehouse Summary tab, where it aggregates information by day, as shown below |
|
Date Shown on Purchase Orders |
Allows you to configure the date shown for Purchase Orders on an Invoice:
Note that these settings will change the date shown on the Warehouse Summary tab, where it aggregates information by day, as shown below |
|
Source of Delivery Name on Sale Orders tab |
Allows the delivery name source (Company or Contact) to be chosen for Sale Orders on invoice summaries. |

Other Invoice Configuration Options
|
Field |
Description |
|
Invoice Value (When Creating consignments) |
Optional Required Not Shown |
|
Generate Single Invoice Per Consignment |
To create an invoice for every consignment then enable this setting. Note: If you have one order for this specific customer with 10 consignments, you will generate 10 invoices. |
|
Automatically group consignments when added to Invoice if Delivery Run, Delivery Address and Delivery Date are the same. |
As explained in the name enabling this setting will reduce the potential for double charging to a single location. However, if you wish to charge for multiple consignments in these scenarios this should be disabled. |
Accounting Connector
What is an Accounting Connector?
CartonCloud can integrate with accounting software applications (in CartonCloud, called Accounting Connectors) to streamline your invoicing process. Once connected, you will be able to send invoices directly from CartonCloud to the accounting platform and have the payment status from the accounting platform automatically updated in CartonCloud.
How to set up an Accounting Connector
CartonCloud integrates with the following accounting software applications:
- Xero
- MYOB
- Quickbooks
- Reckon
Click here for more information.
Accounting Connector Settings
To navigate to the Customer Accounting Connector Settings:
-
Navigate to the Customer pages, Contacts>Customers.
-
Select the relevant customer.
-
Click Edit.
-
Select the Invoice tab and then the Accounting Connector tab.
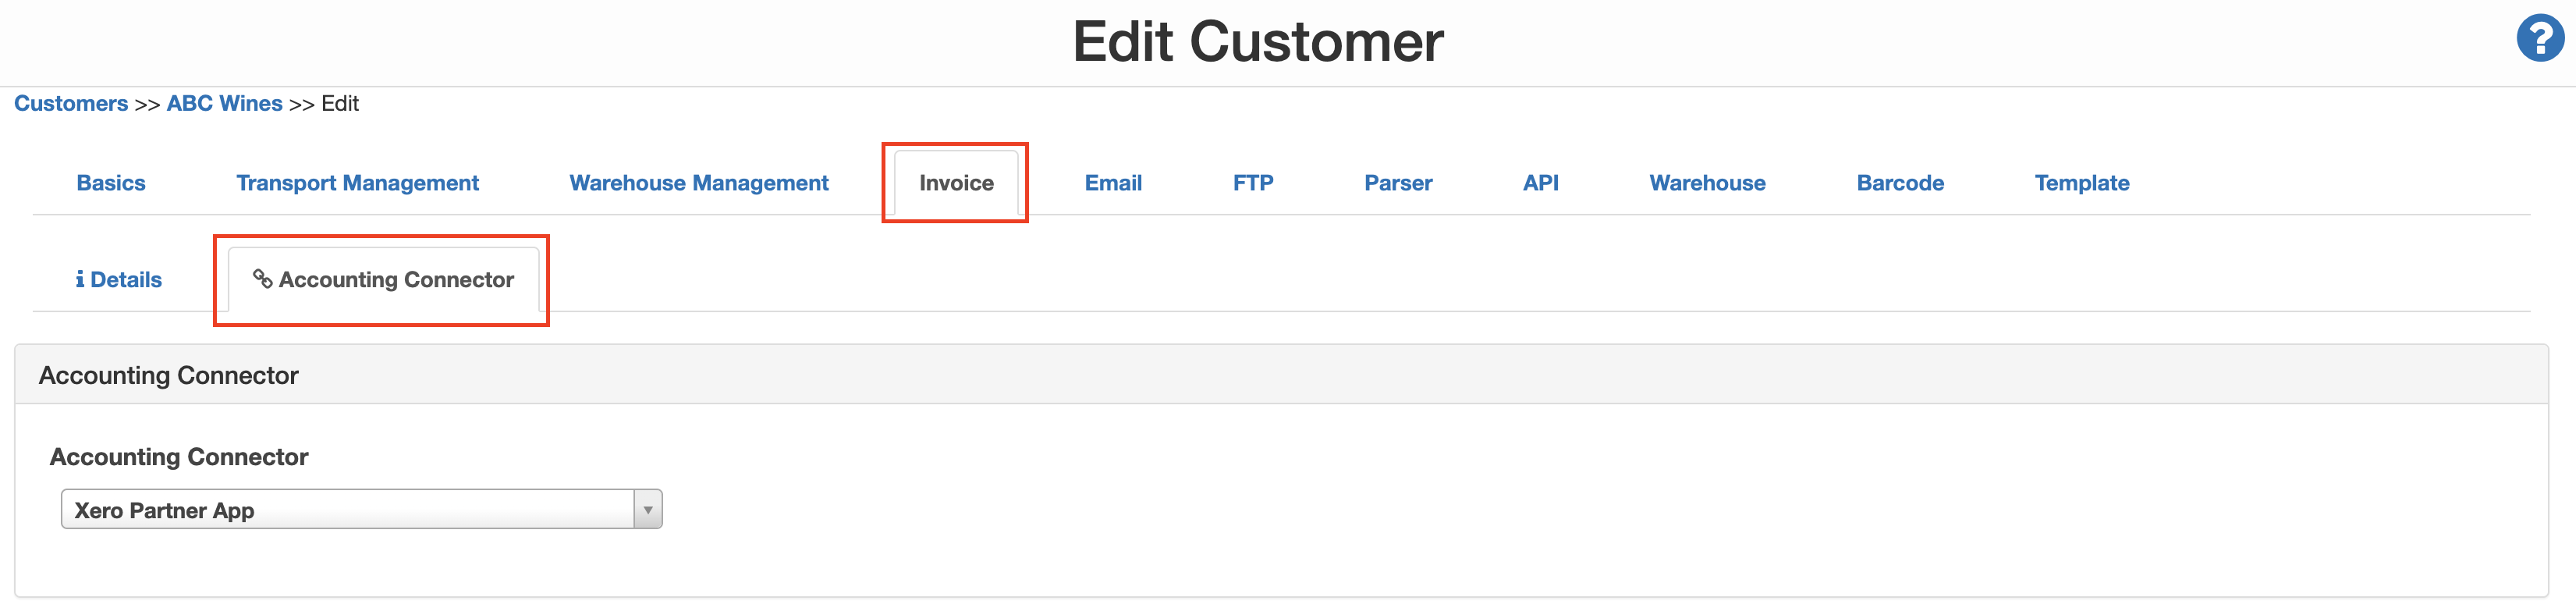
- From here, you can edit and configure the Invoicing Connector Settings as you see fit. Because these are configured at the Customer level, they will only apply to that customer.
|
Setting |
Explanation |
|
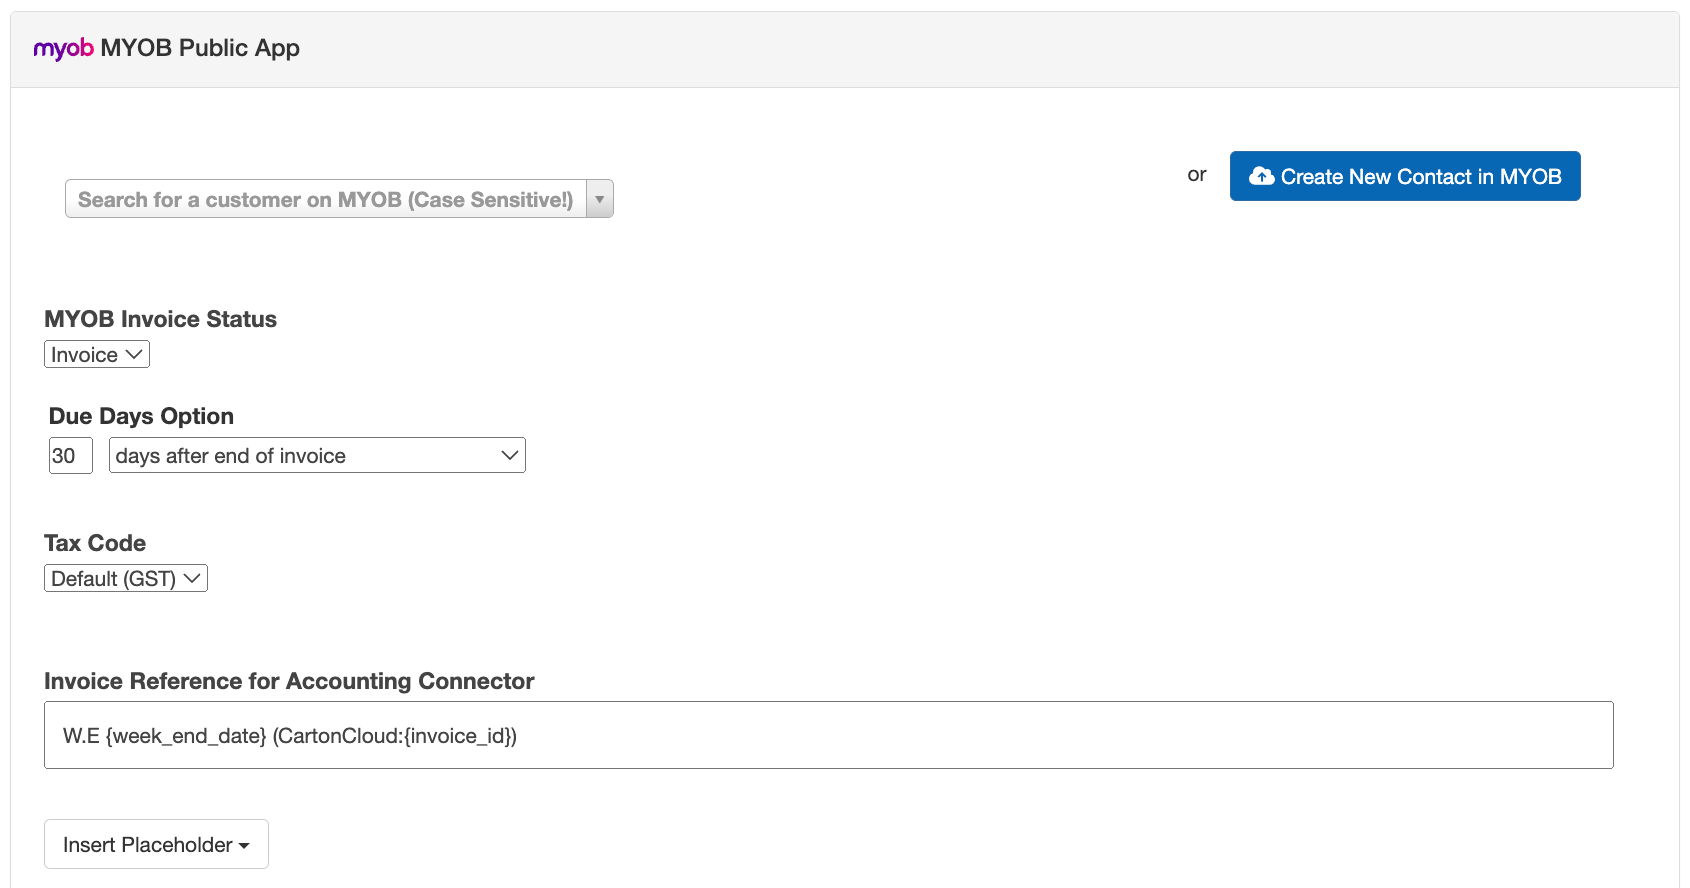
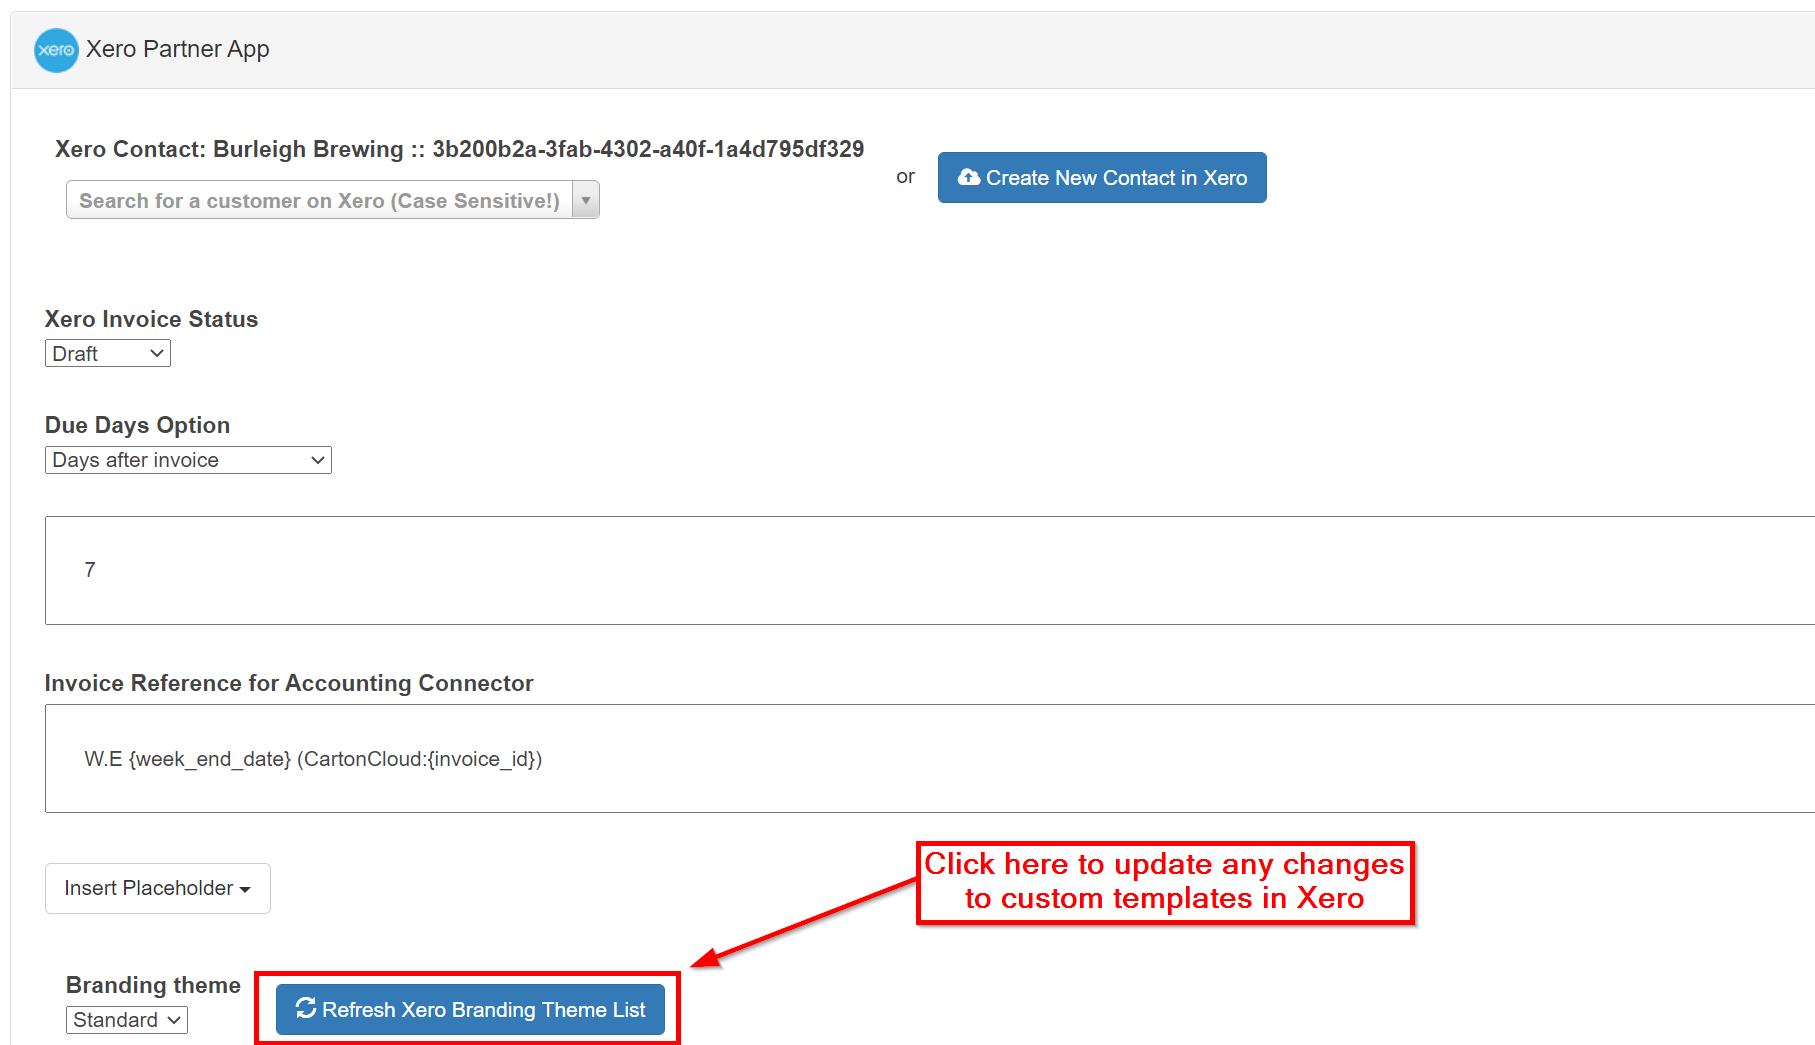
Invoice Status |
The status of the invoice when it is uploaded to the Accounting Platform. |
|
Due Days Option |
The billing date can be configured to the specific: |
|
Invoice Reference for Accounting Connector |
The reference that will populate on the invoice in the Accounting Connector platform. For more information, please click here. |
|
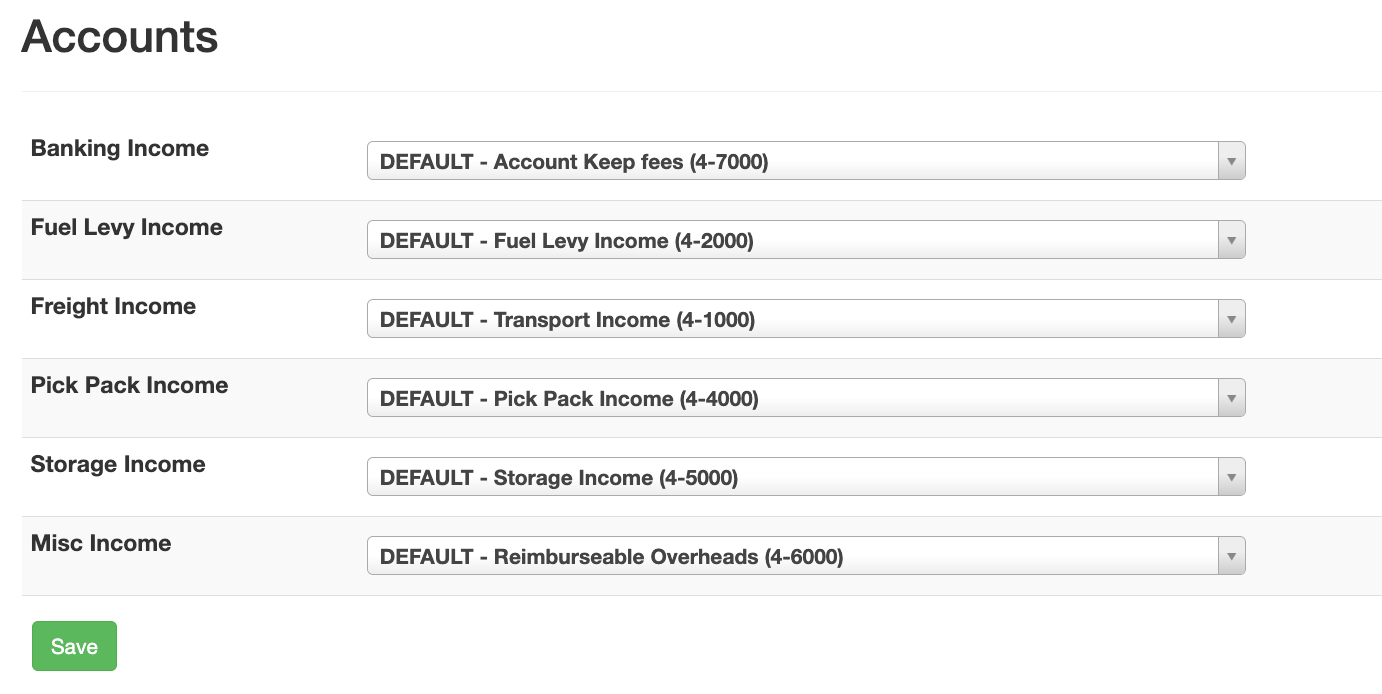
Accounts |
The relevant income codes from CartonCloud match up with the codes in the Accounting Connector software. |
Xero Specific Customer Settings
If you use Xero as your Accounting Connector, there is an additional customer-specific setting called Branding Theme. Branding Theme allows you to assign customers with a specific Xero branding theme as required (you can read more about this setting here: Xero Custom Invoice Quote Templates).
When making changes to this template in Xero, you will need to update your Customer Settings in CartonCloud. Using the Refresh Xero Branding Theme List from the Accounting Connector page in the Customer Settings, you can do this.
This will apply to both NEW templates created and CHANGING of templates for the customer.
Reconciliation Report
The Reconciliation Report allows you to export a list of all Invoices and their corresponding Accounting Connector invoice number.
To access the Reconciliation Report:
-
First, navigate to the Invoices page, More>Invoices.
-
Select the More button and select the Accounting Connector Reconciliation Report you wish to export.

Consignment Line Items
Rather than sending single lines for "Charges for Freight", CartonCloud can send individual Consignments as line items.
Currently, Line-Item support is limited to Consignments. Sale Orders, Purchase Orders and Storage Periods are still sent through as totals.
To enable Consignment Line Items:
- Go to Organisation Settings. Click on the Invoice tab.
- In the "Invoice defaults" box, enable the "Send Consignments information as part of summary when uploading Invoice to Accounting Connector" setting.
Any invoice uploaded to the Accounting application will contain information from Invoice Totals.