
Table of Contents
- What gets sent, and when
- Turning notifications on
- Requiring booking approval
- Who receives the emails
What gets sent, and when
There are four carrier emails. Three are controlled from Settings > Notifications, and the fourth is part of booking approval.
| Sent when | Controlled by | |
|---|---|---|
| Booking cancelled | A booking's status is set to Cancelled | Settings > Notifications |
| Booking time changed | A booking's date, start time or end time changes | Settings > Notifications |
| Booking departed | A booking's status is set to Departed | Settings > Notifications |
| Booking confirmed | A dock is allocated to a carrier's booking | Settings > Site Settings |
Two things never trigger an email:
- Moving a booking between docks. Carriers are told a time, not a door, so a dock change on its own sends nothing.
- Changes to bookings dated in the past. Tidying up last week's schedule will never email a carrier.
Turning notifications on
All three notifications start switched off, so nothing changes until you turn them on.
- Go to Settings > Notifications.
- Switch on the emails you want carriers to receive.
- Click Save Changes.
These settings apply to every site in your organisation. You'll need admin access to change them.
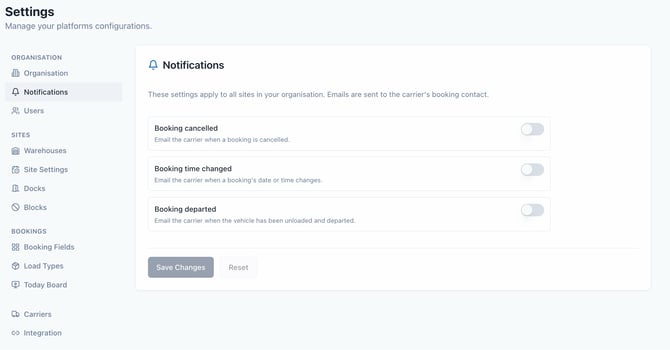
Which ones should I turn on? Most sites start with Booking cancelled and Booking time changed, since both save a phone call and stop a truck arriving for a slot that no longer exists. Booking departed is a completion receipt — useful if your carriers reconcile their own run sheets, unnecessary for most.
Requiring booking approval
By default, a carrier who books through your booking link gets an immediate confirmation with their check-in code, and the slot is theirs.
If you'd rather look at every request first, switch on booking approval. The carrier's booking then arrives on your calendar in the Unassigned lane, and they receive a Booking Requested email instead — no check-in code, and a clear note not to travel to site until they hear from you.
The moment your team drags that booking onto a dock, the carrier is sent their confirmation with the check-in code.
- Go to Settings > Site Settings.
- Choose the site you want to configure, or leave the site selector on your organisation default to apply it everywhere.
- Switch on Require booking approval.
- Click Save Changes.
A few things worth knowing:
- Allocating a dock is the approval. There's no separate approve button — assigning a dock is what confirms the booking and sends the email.
- A booking is only confirmed once. If you later move it to a different dock, or take the dock off and put it back, the carrier isn't emailed again.
- Unapproved bookings stay put. They sit in the Unassigned lane until someone allocates a dock. Nothing expires, so check the lane as part of your daily routine.
- Only carrier bookings are affected. Bookings your own team creates are never treated as requests.
Who receives the emails
Emails go to the address the carrier entered when they made the booking. If there isn't one (eg. on a booking your team created), the email address on the carrier's record is used instead.
If neither exists, no email is sent. Adding an email address against each carrier under Settings > Carriers is the simplest way to make sure nothing is missed.