
Table of Contents
Purpose
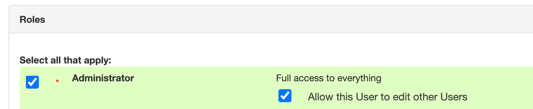
Please note, to be able to create API Clients, you need to have the Administrator role enabled and the 'Allow this user to edit other Users' option selected.
CartonCloud provides an API to facilitate integrations with third-party systems.
To use this API, you must first create an API Client in CartonCloud.
For more technical and detailed information on the CartonCloud API and how to use it, please see the API Documentation.
Use Case and Benefits
Use Case
Your Customer may wish to use the API to send and receive data from their internal system to CartonCloud. Data could include:
-
Sending inbound and outbound orders (Purchase Orders and Sale Orders) to CartonCloud.
-
Sending transport jobs (Consignments) to CartonCloud.
-
Sending new or updating existing Products in CartonCloud.
-
Retrieve stock on hand report from CartonCloud.
Benefits
-
Allows users with the technical skills and knowledge to create their own integrations between CartonCloud and third-party systems.
-
Enables the user to send data into CartonCloud from another system and retrieve information from CartonCloud.
-
Greater control over data retrieved and sent between the two systems.
-
Have access to the return messages to troubleshoot if issues do occur.
-
You do not have to wait for a particular trigger to send and receive information, as you have the freedom to do so at any time.
Sandbox Customer Testing (Optional)
Before using the API Client on a live Customer, it is highly recommended that you create a Sandbox Customer first to test the API.
A sandbox is a testing environment utilised to test API calls that will not impact the live Customer's account and data.
To create a Sandbox Customer:
-
Duplicate the Customer you are giving API access to. See Adding Customers and Duplicating Customers for instructions on how to duplicate a Customer.
-
Ensure the name of the Customer includes the word Sandbox to avoid confusion. For example, 'Coastal Coffee Company Sandbox'.
-
Provide the API user with Customer access to the Sandbox Customer. See Creating or Inviting New Users for instructions on how to add a new user.
-
Provide the API user with the Sandbox Customer UUID, Tenant UUID and Warehouse UUID (if more than one warehouse). See the UUID section of this article for more information.
-
Optionally, you can create Products in the Sandbox Customer. See Exporting and Importing Products for instructions on how to create new products in bulk.
-
You can then create test orders to ensure the structure used to send the data to CartonCloud is correct.
If creating a Sale Order, ensure there is available stock (Purchase Order is in allocated status).
-
Once testing is complete, you will update the API Client with access to the live Customer. See the Going Live with the API Client section of this article before updating the API Client with access to the live Customer.
See the Going Live with the API Client section of this article before updating the API Client with access to the live Customer.
How To Steps
How to add an API Client
-
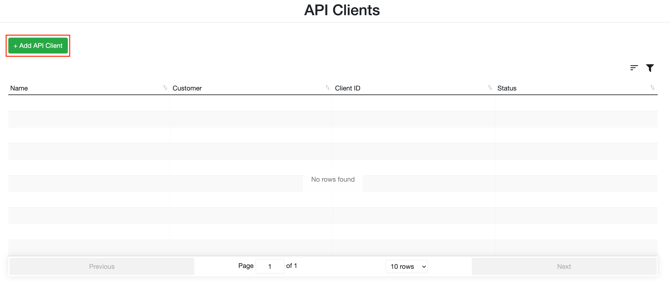
Navigate to Contacts>API Clients.
-
Select +Add API Client in the top left corner.
-
Fill in the Name field with a descriptive name relating to the client.
If this is the first time creating an API Client for the Customer, it is highly recommended you create a sandbox customer first. Ensure you include the word sandbox in the name field when creating the sandbox customer. See the Sandbox testing section of this article for more information.
-
Select the Customers and Warehouses you wish to give the API access to.
- In the Role field, select Administrator, Customer, or Manual, you must choose one before you can save.
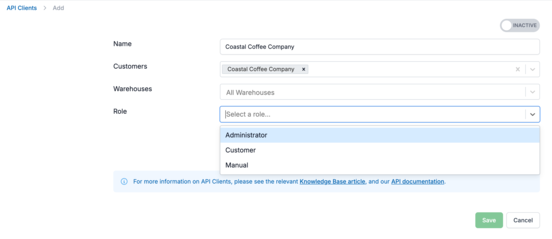
- Choose Administrator or Customer to give the API Client the permissions associated with that User role. These are the same roles available when adding a User. An Administrator API Client has the same API permissions as an Administrator User, and a Customer API Client has the same API permissions as a Customer User.
- Choose Manual to build a custom set of permissions using the API Roles checkbox grid.
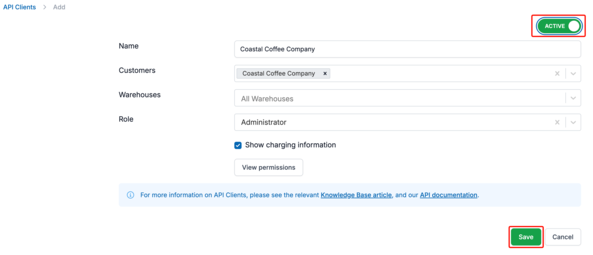
- Tick Show charging information if the API Client needs to receive the invoice and bill each Consignment is assigned to. See Showing charging information to an API Client. This checkbox isn't available when the Role is Customer.
See API Roles for more information.
-
Optional - Select View permissions to check exactly what this API Client will be able to do before you save. See Viewing an API Client's Permissions below.
-
Slide the INACTIVE toggle to ACTIVE.
-
Select Save.
-
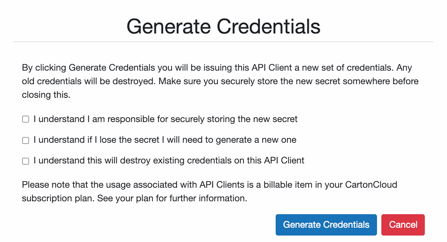
A pop-out window will be prompt you with information regarding generating credentials.
-
Once you have read the information, tick both boxes and select Generate Credentials.
-
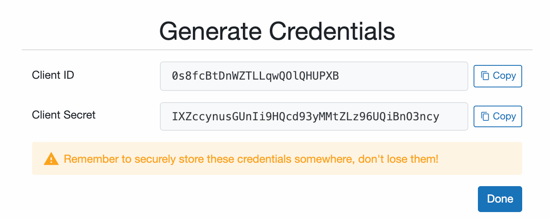
The Client ID and Client Secret will be displayed. Remember to store these credentials securely and don't lose them. You will need to provide these to the API user.
If you do lose the credentials, please see the Generating New Credentials section of this article.
-
In addition to the above information, you will also need to provide the API user with the Customer UUID, Tenant UUID, and, if applicable, the Warehouse UUID (if more than one warehouse).
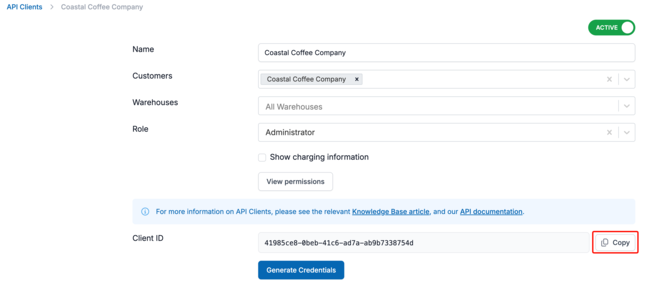
Using the Copy button next to the Client ID and Client Secret allows you to easily transfer the data to the API user. You can also do this from the Edit API Client page.
Showing charging information to an API Client
Charging information in CartonCloud covers invoices, which are what you charge your Customers, and bills, which are what your suppliers (such as Carriers) charge you. When CartonCloud assigns a Consignment to an invoice or a bill, it records a reference to that invoice or bill.
By default, API Clients don't receive any charging information. The Show charging information checkbox lets you choose which API Clients receive invoice and bill references. You don't need to change any User settings to do this.
What the API Client receives when the checkbox is ticked
|
Record |
Information included |
When it is included |
|
Consignment |
Invoice reference (invoice.id) |
The Consignment is assigned to an invoice |
|
Consignment |
Bill reference (bill.id) |
The Consignment is assigned to a bill |
These references are returned when the API Client retrieves a single record and when it searches for records. Each reference is the invoice's or bill's unique ID (UUID).
When the checkbox is unticked, the API Client receives the same records without any invoice or bill references.
Viewing an API Client's Permissions
Before you save an API Client, you can check exactly what it will be able to do based on your current Role selection — including changes you haven't saved yet.
To view an API Client's permissions:
-
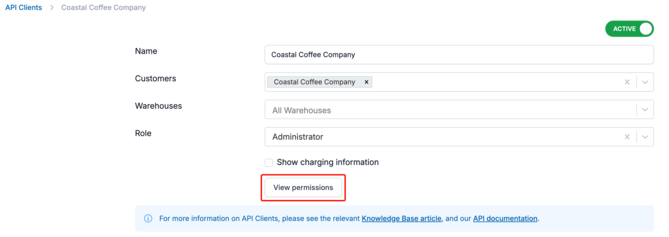
On the Add or Edit API Client screen, select a Role. This enables the View permissions button.
-
Select View permissions.
-
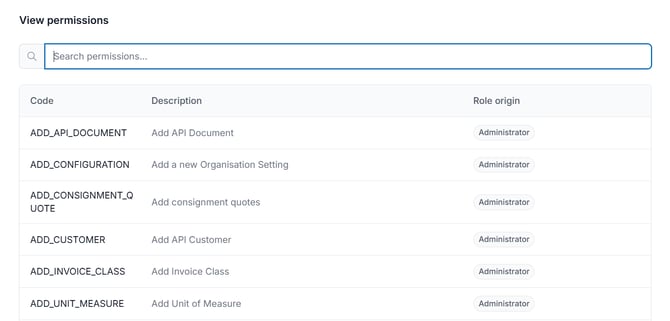
Review the list of permissions. Each row shows the permission code, a description of what it allows, and which role it comes from.
-
Use the search field to filter the list by code, description, or role name.
-
Select Close to return to the Add/Edit screen. You can't make changes from inside this window.
Editing an API Client's Role
To change the role assigned to an existing API Client:
- Navigate to the API Clients page, Contacts > API Clients.
- Select the API Client and select Edit.
- Update the Role field as needed.
- Select Save.
When you open an existing API Client for editing, the Role field shows:
- Administrator or Customer — if the API Client currently has exactly that one role assigned.
- Manual — if the API Client has no roles assigned, more than one role assigned, or a role that isn't Administrator or Customer (including legacy roles such as Packer).
What's Included in the Administrator and Customer Roles
Administrator and Customer are the same roles assigned to web app Users, not roles created specifically for API Clients. The permissions listed below were added to (or, in Customer's case, removed from) these roles directly — so they apply to every Administrator or Customer User already in your account, as well as to any API Client using that preset.
Administrator Role — Permissions Added
|
Permission |
What it enables |
|
Add Consignment Quote |
Requesting a quote for a Consignment via the API. |
|
Delete Inbound Order |
Deleting a Purchase Order via the API. |
|
Delete Outbound Order |
Deleting a Sale Order via the API. |
|
Edit Consignment Charges |
Adding or updating charges on a Consignment via the API. |
|
Trigger Webhook Request |
Triggering a webhook via the API. |
Customer Role — Permissions Added
|
Permission |
What it enables |
|
Add Consignment Quote |
Requesting a quote for a Consignment via the API. |
|
Delete Inbound Order |
Deleting a Purchase Order via the API. |
|
Delete Outbound Order |
Deleting a Sale Order via the API. |
The Customer role does not include the Edit Warehouse Product permission. As a result, requests to update a Warehouse Product via the API are rejected, including when updating products belonging to the Customer.
If a Customer needs to update Warehouse Products via the API, configure the API Client with:
- Role: Manual
- Permission: WMS Edit Product
The Add Warehouse Product permission is included with the Customer role, so creating Warehouse Products is not affected.
Universally Unique Identifier (UUID)
The Universally Unique Identifier identifies certain information in a computer system. It ensures that data is being sent and received from the correct Customer, Tenant and Warehouse.
You will need to provide the API user with the;
-
Customer UUID (during testing, you will need to provide the Sandbox Customer UUID and then later the live Customer UUID).
-
Tenant UUID
-
Warehouse UUID (only if you have more than one warehouse)
To locate the Customer UUID:
If you are creating a Sandbox Customer, ensure you provide the Sandbox Customer UUID for testing, and once testing is complete, you provide the live Customer UUID.
-
Navigate to the Customers page, Contacts>Customers.
-
Select the applicable Customer.
-
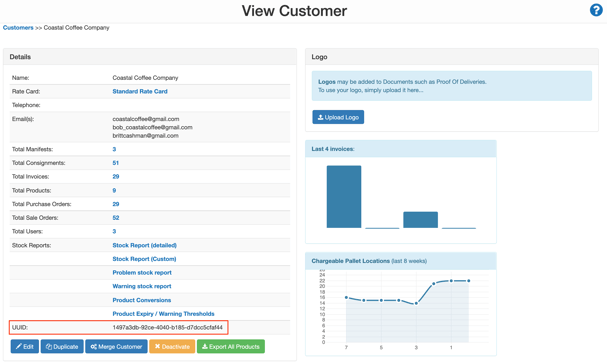
The UUID is within the Details box at the bottom of the screen.
To locate the Tenant UUID:
-
Navigate to Organisation Settings, More>Organisation Settings.
-
Navigate to the Organisation tab.
-
The UUID is within the Basic Organisation Information box at the bottom of the screen.
To locate the Warehouse UUID:
-
Navigate to the Warehouses page by typing Warehouses into the Search for anything bar.
-
Use the UUID column to find the UUID for the relevant Warehouse.
Going Live with the new API Client
If you tested the API Client with a Sandbox Customer, follow the below steps before going live with the new API Client:
-
Delete all of the sandbox customers orders/consignments in CartonCloud.
-
Deactivate the sandbox customer in CartonCloud.
-
Edit the API Client and remove the sandbox customer and add the live customer.
-
Provide the user with the live Customer UUID.
Once the API Client is updated with the live Customer, you can track their usage (the number of API calls made) using the API Client Usage Report. Please see the API Client Usage Report page for more information.
Generating New Credentials
Note that the old credentials will become invalid if you generate new credentials, and any existing connections that use the old credentials will fail.
If the credentials of an existing API Client are misplaced, you can generate new credentials.
-
Navigate to the API Clients page, Contacts>API Clients.
-
Select the API Client.
-
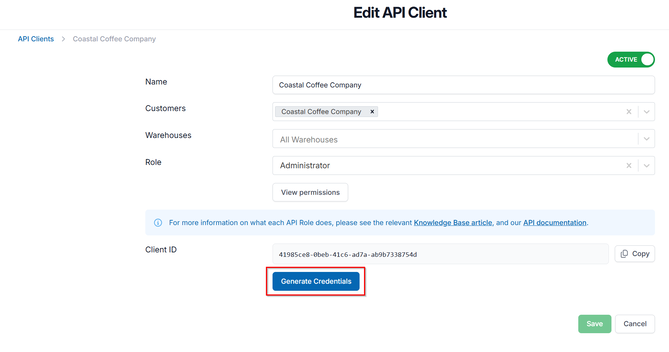
Select Generate Credentials.
-
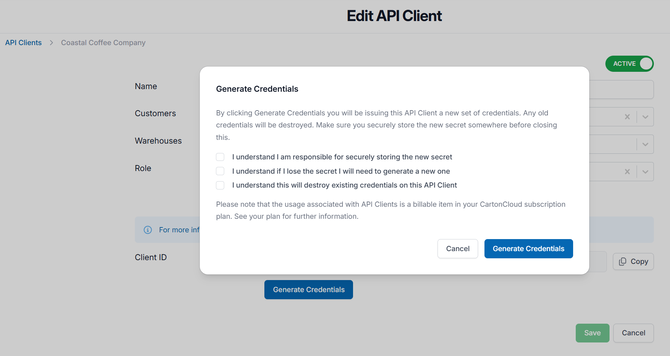
Carefully read the information provided before generating new Credentials, as creating new credentials will destroy the old credentials, which can break existing integrations.
-
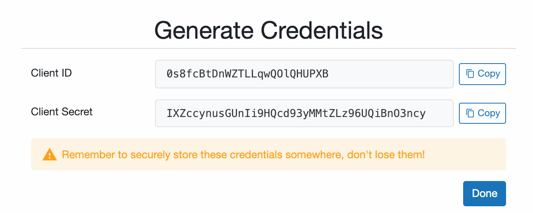
Once confirming you wish to proceed, the new Client ID and Client Secret will be displayed. Remember to store these credentials securely and don't lose them.
-
The developer will also need the Tenant UUID and Customer(s) UUID when advising of credentials.
Postman Setup for API Access
You can access our CartonCloud API Postman Collection here: https://www.getpostman.com/collections/f8efd52a0c0d1a82d197
Once imported into postman, you'll need to setup collection variables and then get an API token.
Clicking on the collection in postman will bring up the collection settings.
First, navigate to the "Variables" tab, and insert your tenantUuid, customerUuid, authClientId and AuthClientSecret into the "Current Value" column.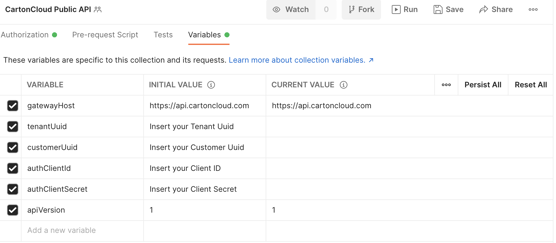
If you don't know the tenantUuid and/or customerUuid, you can find this out once you have a working Access Token by making requests to: https://api-docs.cartoncloud.com/#user and https://api-docs.cartoncloud.com/#list-customers respectively.
For more help with Variables refer to the Postman Documentation
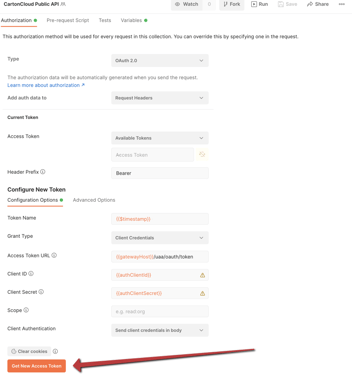
- With these variables filled out, jump to the "Authorization" tab and you'll be able to Get New Access Token:
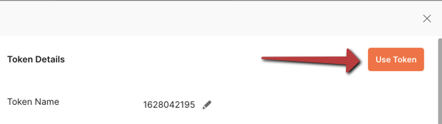
- With the access token generated, click Use Token.
Please note excessive API usage charges apply, click here for more information.